Lazy Daisy Block

img_2615

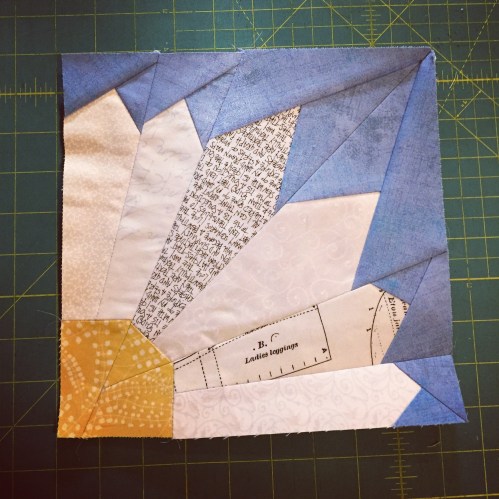
This is the Lazy Daisy block designed by Amy Gay of Butterfly Angels Quilts. It is a free foundation pieced pattern that I thought would make a great block for a Sewing Bee that I am currently involved in with the DC Modern Quilt Guild. This is the first time that I’ve joined a Sewing Bee. 5 of us have been grouped together and each month one of us asks the other 4 to sew up a few blocks using the pattern and fabric selection of our choice. We can provide fabric or ask for the others to sew from their stash.  My hive will be sewing for me in February.

If you are making a block for me, either because you’re in my hive, or just because you’re my friend and know I would love to have a block from you, please read through this entire post before starting. I’d like to make sewing this block as simple as possible and I hope the info and photos here will save you some time. Thank you in advance!!

fullsizeoutput_2237

My fabric selection

I am going to ask for white or light cream solids or low volume prints for the daisy petals. I would like blue sky colored fabric for the background and prefer solids, or like-solids, although I can see how some prints might work well too – I just don’t seem to have them in my own stash. I would like these to be any value of a blue you could imagine in the sky. True blues, even navy but not aqua or turquoise. Finally, I would like the centers to be yellow and/or gold.

fullsizeoutput_2236A word about paper: I like to use Carol Doak’s Foundation Paper. It is a thin paper that you can somewhat see through that tears away easily when you are done.

This pattern consists of 1 title page and 4 pattern pages. The only directions are what is printed on the title page as the “sewing order”. After making up the block myself, I thought it would be helpful to my bee-mates to have more instruction. I found the block easy to sew once I figured out a few logistics. The petals are each pieced separately and then joined together.fullsizeoutput_2238

The first step was to rough cut around each of the paper pieces. Petal D has to be taped together. I went ahead and precut my fabric into the following size pieces:

White:  (4 pieces) 3 x 8″ and (2) 4 x 8″

Blue background: (2) 3″ squares cut diagonally,   (2) 4″ squares cut diagonally, (4) 3 x 8″, (2) 4 x 6″   To be honest – I didn’t cut enough blue at first and had to cut more.

Yellow/gold: (3) 3″ squares

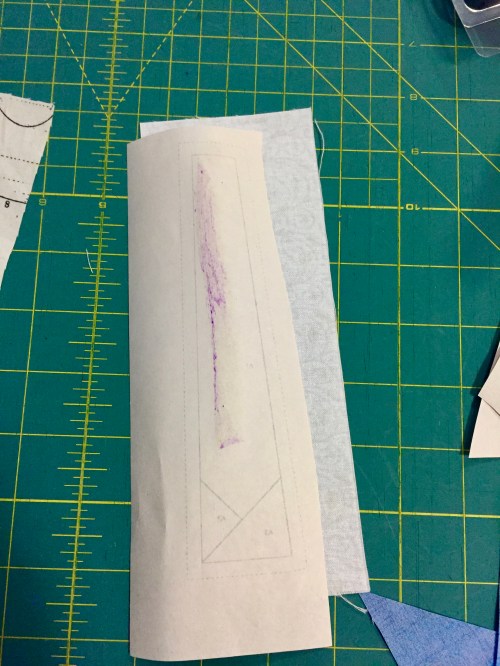
Each petal piece (A thru H) starts with a white fabric strip glued onto the back side of the paper. The wrong side of the fabric is glued to the wrong side of the paper. I used an Elmer’s purple washable glue stick which worked like a dream. It goes on purple but dries clear. It holds the fabric to the paper through all the sewing and trimming but peels right off at the end.
fullsizeoutput_2239

Put a good amount of glue onto the back of the paper where the white fabric strip will be placed and then . . .

fullsizeoutput_223a

. . . glue the wrong side of the white fabric piece to it. Cover the whole A1 area.

fullsizeoutput_2228

I like to make a crease where the sewing line is going to be. (Between A1 and A2 in this example)

fullsizeoutput_2227

Place a blue fabric piece (right sides together) over that crease such that when sewn and ironed in place, it will cover A2 on the paper.

fullsizeoutput_2226

I shortened my sewing stitch to 2.0 and sewed as shown. I sewed through the marked seam allowance and I did sew just one stitch into A3.

fullsizeoutput_223b

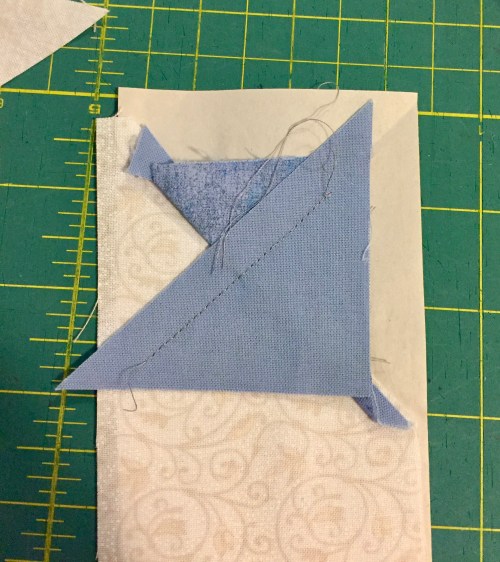
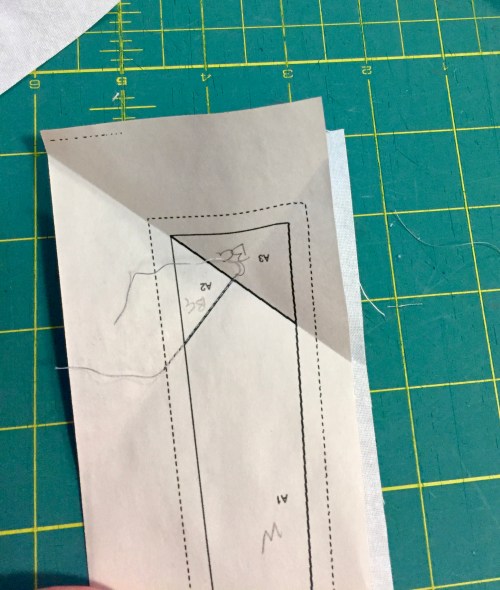
Leaving the fabric exactly as sewn, fold the paper only back along the stitching line and trim to a 1/4″ seam allowance. Now you can iron the blue fabric into place.
fullsizeoutput_223c

Crease along the next sewing line

fullsizeoutput_223d

Place the next blue piece

fullsizeoutput_223e

Sew the line between A2 and A3

fullsizeoutput_223f

This shows what the right side looks like after sewing

fullsizeoutput_2240

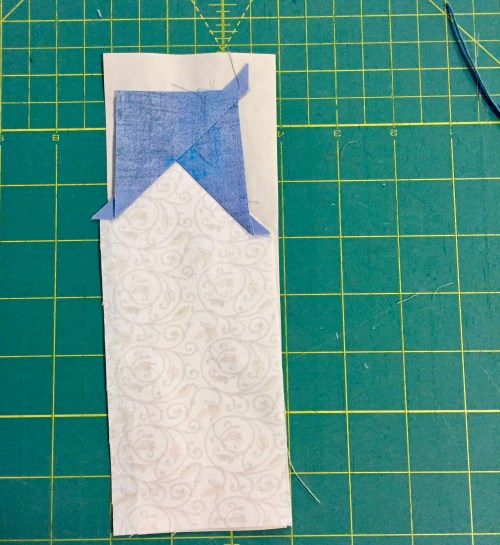
Again, leaving the fabric as sewn, fold back the paper only along the stitching line and time leaving 1/4″ seam allowance.
fullsizeoutput_2241

Press the blue piece back into place

fullsizeoutput_2243

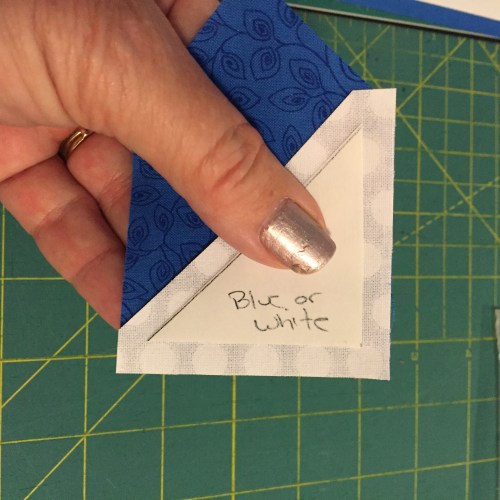
Now trim along all of the dotted lines on the paper

fullsizeoutput_2242

Right side of trimmed piece

fullsizeoutput_2245

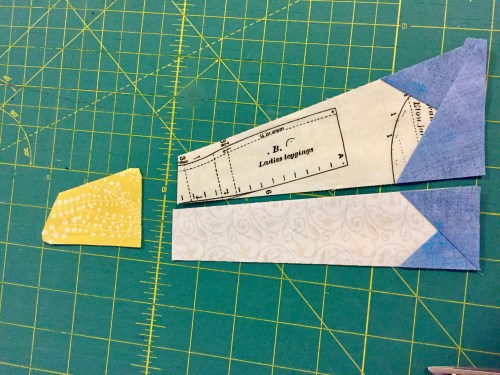
Once the A & B petals have been pieced and trimmed, they can be sewn together. Glue the yellow fabric to the paper piece C1, trim it and then sew this onto the AB piece.
fullsizeoutput_2244


I like to line up each of 2 pieces that are going to be sewn together by placing them right sides together and then inserting a pin through the ends of the seam lines to make sure they are exactly lined up correctly. I did not get a photo of this.

Also – you do have to make sure you are joining the pieces along the correct seam line. The photo above shows the correct orientation of these 3 pieces. A is on the bottom when looking at this from the right side. B is on top in this photo.

fullsizeoutput_2246

Repeat the process with D-E-F and G-H-I and then join them together. (see note below about removing paper from seam allowances after sewing)fullsizeoutput_2247

fullsizeoutput_2248

I did remove the paper from the narrow seam allowances after sewing and pressed those seam allowances open to help the block lay flatter. I removed the paper from the seam allowance of A & B before sewing C to it, etc.

fullsizerender

If you are in my hive, I would like to supply you with the printed papers for 2 blocks and a glue stick. If I do not see you at an upcoming meeting, I will mail these to you. Please leave the paper in place when you return the blocks to me. I will remove it when I sew the quilt together.

If you are not in my bee but are willing to make a block for my quilt, I would be absolutely overjoyed to have more blocks! I can also provide you with the papers and glue if you ask me or you can use your own.

Thank you!


4 Comments

Filed under DC Modern Quilt Guild, Uncategorized

I’m with her – quilt block template


img_1556

Finished and quilted block

I wanted to make a zippered pouch with Hillary Clinton’s “I’m with her” logo on it. My friend, Dana, had made and posted some she made on Instagram (danaandthread).

img_1559-1Aren’t they great? I love these! She made hers using the block instructions from Maritza Soto (sotosewn on IG) who has a free pattern on Craftsy. The directions are for a 15 x 18″ block and reducing it didn’t seem to be a simple matter (for me) and so I decided to try to paper piece it in a smaller size.

Template for 8.5 x 9.5″ block. Obviously the finished size could be altered by the width of the outside pieces (#2, 4, 11, 12, 13).

You can download this template by clicking here: I’m with her.  I made mine using freezer paper piecing. I printed the template on freezer paper and cut it apart. (Note that there is a 1″ mark in the center of piece #10 to be sure it printed to scale.)

Templates ironed onto the wrong side of my fabrics

Templates held right sides together, ready to be sewn right along the paper template.

Sewn and pressed toward the darker fabric.


img_1543

Pieces #1 – 5 were the only “tricky” pieces to align.

I used registration marks on the paper to help line them up for sewing (note the red and blue marks). Although I did piece this one entire block using the paper templates for the purposes of this tutorial, pieces 6 thru 13 could be cut & sewn in a conventional manner. Pieces 6 -9 are 2″ square finished or 2.5″ square unfinished, etc.


Above is a flipagram showing how the block went together.  This was a fun and easy way to make this block.

img_1557

image

Finished pouches

image

Do you have an even easier way to make up this block? Let me know in the comments.


16 Comments

Filed under Purses and Bags, Uncategorized

Alabama Chanin style T shirt

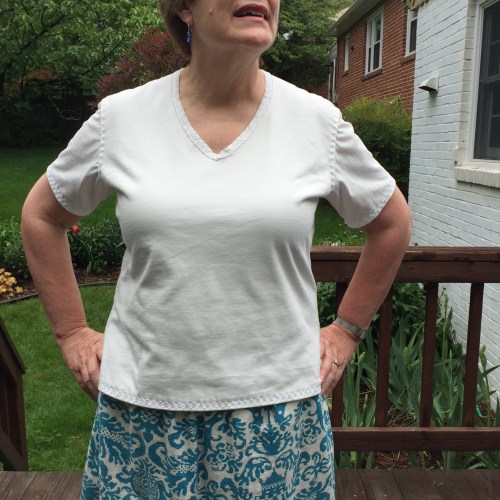
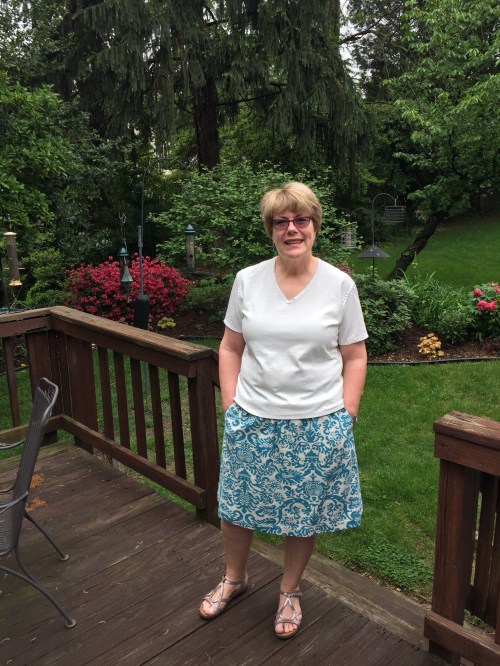
I’m kicking off “Me Made May” with a bang. I have totally hand sewn a T-shirt! I bought this organic cotton fabric from Alabama Chanin and it is dreamy.

I’m wearing it here with a skirt I made years ago. The pattern is the Everyday Skirt from oliver & s. It is an easy sew and I love the pockets!


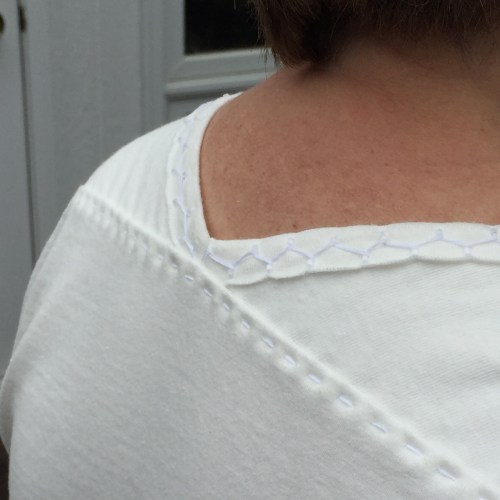
To make the top, I traced around a favorite T shirt that I owned. I used a folded knit band to finish the neckline and sewed it down with a decorative stitch incorporating small little chop beads as I went.

I hemmed the bottom of the shirt and the sleeves using another decorative stretch stitch found in the book Alabama Studio Sewing + Design.

All of the seams were hand sewn using a regular running stitch and then felled to one side also with a running stitch.

Practice samples

Fun beads and sequins from Alabama Chanin


I made this shirt specifically to wear with the Alabama Chanin skirt I am currently sewing. I guess I had better get going on that!

IMG_9463

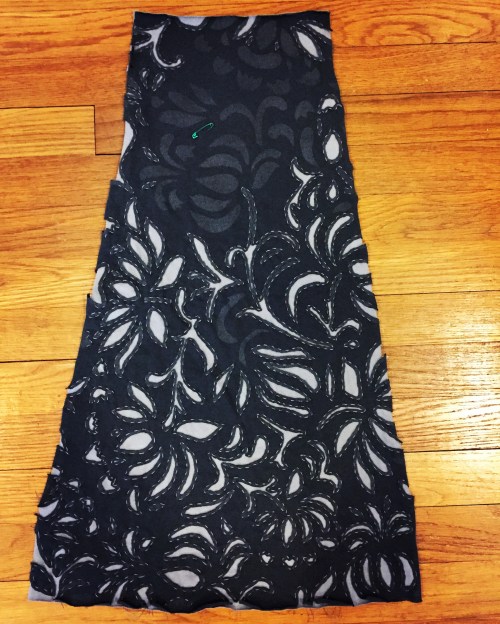
1 of 4 skirt panels. This is a double layer of knit that has been stenciled and then “quilted” together and the top cut away to expose the underneath layer.

Notes to self (or anyone else who’s interested):

  1. I used 2 layers of cotton knit on the front of this shirt and only one layer for the back and sleeves. I thought I might do some reverse appliqué on the front but put the bottom layer of knit with the right side towards the inside of the shirt. I could probably still cut and expose the layer with the wrong side showing, but it would bother me. Next time put both right sides facing the same way as I did with the skirt.
  2. I found the directions for Creating Mitered Binding for a V-neck in the book Alabama Studio Sewing Patterns on page 22.
  3. Directions for garment construction and the stretch stitches are in all of the books.Alabama Studio Sewing + Design has them on pages 24 – 27.
  4. Same book (as#3) has a page of pretty circular stitches  – Pg. 81  These are used for a beautiful skirt on page 101 of the Alabama Studio Style book.


10 Comments

Filed under Garment sewing, Uncategorized

Foundation piecing with Freezer Paper

DC Modern Quilt Guild has a skill building Quilt Along going on right now. Anna from Life Sew Crafty has challenged us with a weekly quilt block. Anyone can join in this fun challenge! Go to Anna’s blog or join this Facebook group.

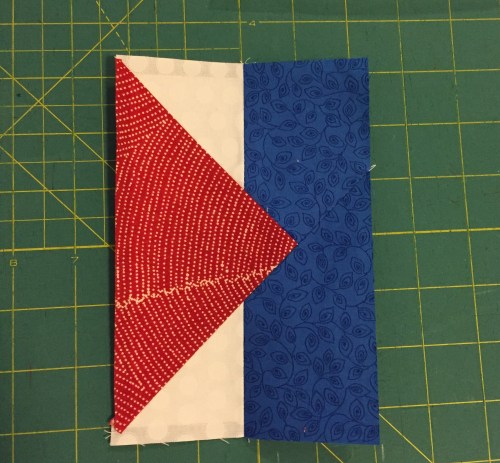
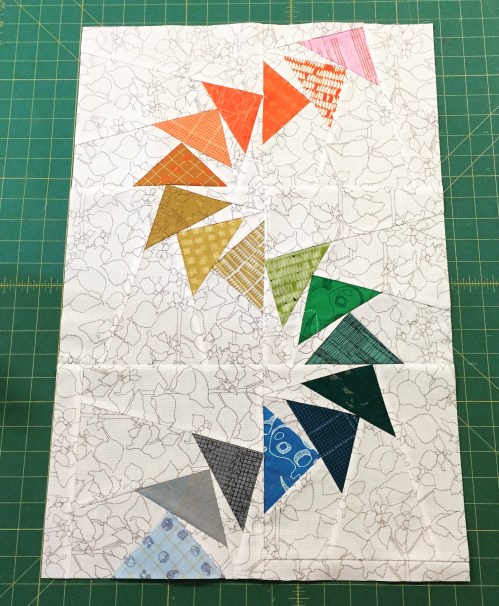
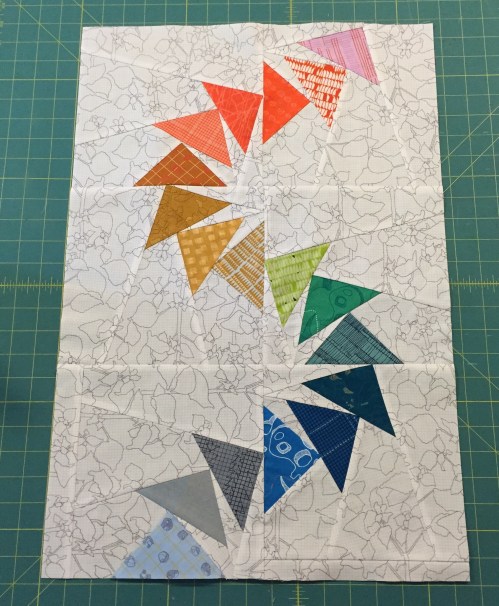
Blocks 1 thru 5 are pretty straight forward. Block 6, however, is one of several “theme” blocks the quilt will contain. I chose a “flying geese” theme and found this trail of geese block from Daniel of Piece and Press. It is a foundation pieced block and he says in his post that he used a freezer paper technique to sew it.

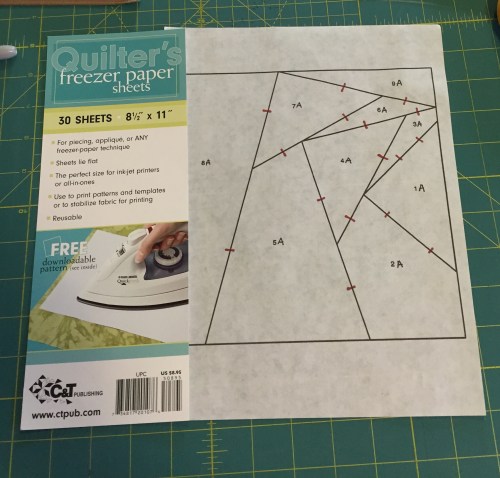
I had some freezer paper sheets that are sized for printing. After resizing the block to fit the size I needed for the QAL quilt, I printed it onto the freezer paper sheets and made two red registration marks between each piece. This block only has 9 pieces which I think made it especially suitable for this technique. *The complete trail of geese block contains 6 of these individual blocks – 3 of which are mirror image.

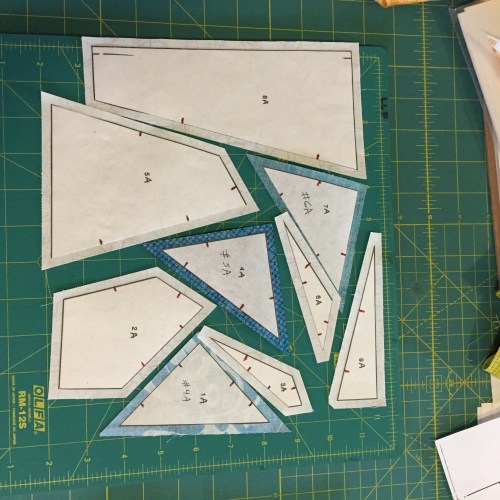
Each template piece was cut out and ironed onto the wrong side of it’s corresponding fabric and then the fabric was cut 1/4″ larger than the template.  In this block six of the pieces are background and three are the geese. I numbered the geese (and my fabric) 1 thru 18 in order to have the geese end up in the color order I wanted.

They were arranged back into their block positions and then sewn together in order –  the registration marks made it very easy! I placed right sides together and sewed along the paper edge – not through it.

Once done, the paper was simply and easily peeled away. This is so much easier than removing paper from stitching. I’m not sure this technique would work for a more complicated foundation pieced block, but it sure was great for this one!
There is a great round-up of foundation piecing tutorials by VeryKerryBerry here.

This was a fun block to sew and I look forward to the upcoming theme blocks during this Quilt Along.

7 Comments

Filed under DC Modern Quilt Guild, Uncategorized

Valentine hearts?

Christmas stocking for my cardiologist husband.  (Pattern specifics for both hearts and stocking are at the end of this post)

I did not get this stocking made in time to hang it on the mantel for Christmas. Does having it done by Valentine’s Day count for anything? This was the project I worked on during “Snowzilla” – 24 inches of snow in DC. (It kind of felt like Christmas!)

I marked the sewing lines on all of these squares.

I sewed across all 3 corners without removing from the machine - just pivoted.

I sewed across all 3 corners without removing from the machine – just pivoted.

Chain piecing made the project go faster.

The finished hearts are very boxy until you sew them together which produces the more rounded looking hearts.


Voila! I now have 2 stockings made. These happen to be for the oldest and youngest members of my family. 5 more to go. Maybe there will be another snow storm!?!

The heart directions are from a mini quilt tutorial by Jera of Quilting in the Rain.

The Christmas Stocking pattern by Fons and Porter can be found here. They are a great size – almost 2 feet long!

13 Comments

Filed under Christmas Stockings, Family, Uncategorized

Decorative Zipper Band on the Back of a Pillow

xx

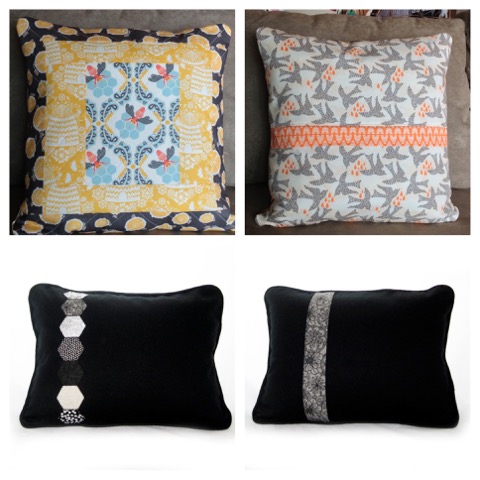
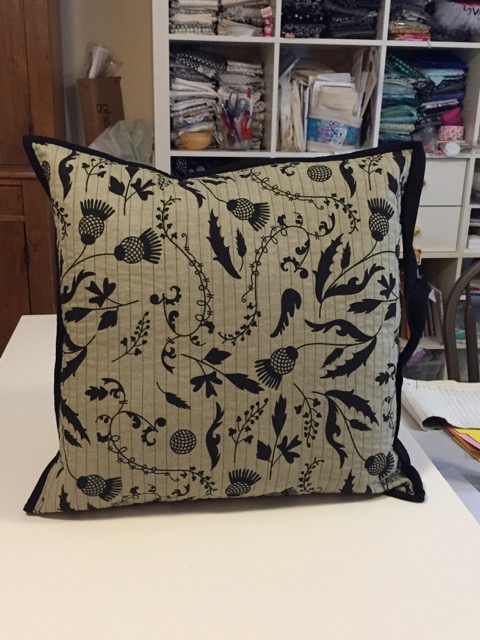
Front and back of the same pillows

I love to make pillows and give them as gifts. It’s nice if the cover is removable so that it can be washed or changed out. I like to put in a zipper and to cover it with a contrast fabric band. It makes the back look as pretty as the front!

xx

Front

xx

Back

For an 18″ pillow start with:

  1. Pillow Front – this can be a single piece of beautiful fabric or an orphan quilt block or something you sew together specifically for who you are making the pillow for. This pillow front can be quilted or not. If you quilt it, you will want to add batting. If you don’t quilt it, depending on the weight fabric you use, you may want to interface it. For this example the front was cut 18″ x 18″ after quilting.
  2. Pillow Back – I cut the back the same width as the front (18″) and 1 inch longer than the front (19″).  18 wide x 19″ long. I fuse on the same size piece of interfacing (again based on fabric used),  and then make a horizontal cut where I want to add the contrast band that will hide the zipper.
  3. Contrast Band – One piece cut 4″ x the width of the pillow. For this pillow: 18″ wide x 4″ long.  I also interface this piece if it is quilting cotton weight. (I often use the same fabric that I will edge the pillow with.)
  4. Fabric for edging – 2 strips cut the whole width of the fabric. If I bind the edges of the pillow I cut these strips 2 1/4″ wide. If I am going to insert cording into the edge, I base the width on the size of the cord. Lately I’ve been using 6/32″ cotton filler cord and I cut the strips 1.5″ wide cut on the bias. I sew these 2 strips together using a diagonal join which gives me a single strip that is about 80″ long.
  5. Zipper – A plastic teeth (tooth?) zipper that is longer than the width of the pillow. In this case 20″ or longer.
  6. Pillow form – 18″ pillow form. This will be a little larger than the pillow cover which will make a nicely stuffed pillow.
xx

Project pieces as listed above – Front, back (divided into 2 pieces), band, zipper.


Fold the contrast band in half lengthwise with wrong sides together. This folded band is now 2″ x 18″.

xx

Zipper placed correctly on band. Zipper face down and extending beyond edges on both sides.


Place the zipper wrong side down along the raw edges of the folded contrast band. The extra length of the zipper should be sticking out on both ends. Baste in place

xx

Now attach the zipper and band to the pillow back top.


xx

Top of pillow back now looks like this.


Add this basted unit to the top piece of the pillow back, align the edges and pin in place. If you pin the way I have in the photo below, it will allow you to then open the zipper to sew this side of the zipper in place.

xx

Place other side of zipper to bottom bottom and pin as shown above.


Sew the bottom of the pillow back to the other side of the zipper. There is no need to baste this side first. The right side of the zipper is sewn to the right side of the pillow back.

xx

Open zipper to make sewing easier.


xx

Zipper back almost done!


xx

This photo shows the zipper hiding under the contrast band.


xx

Move the zipper stop to the middle of the pillow and stitch along both sides.


xx

Trim zipper.

The back is now done. It should be trimmed to the same dimension as the front (18 x 18″). If you are going to bind the edges, the front and back are placed wrong sides together and basted around the edges. The binding is now applied to the edges to finish the raw edges.

xx

Binding on edges

If you are going to insert cording into the edges, cover the cording with bias cut fabric which allows the cording to go around the corners easily. This is sewn onto the right side of the pillow front and then the front and back are sewn together right sides together.

xx

Another pillow – front and back. Corded edges.

Happy Sewing!


5 Comments

Filed under Gifts, Pillows, Tutorials, Uncategorized

2016 Calendar Tea Towels

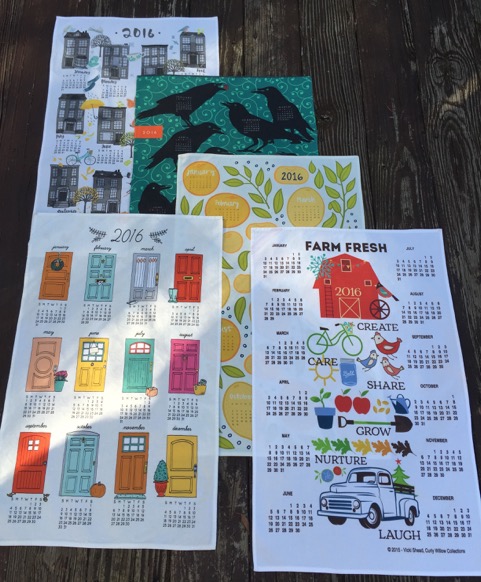
Linen/cotton fat quarters from Spoonflower

Linen/cotton fat quarters from Spoonflower

This is an easy project to welcome in the New Year. I bought these tea towels online from Spoonflower. They aren’t actually towels yet in this photo because the fabric edges are raw and fraying. If you click on this Spoonflower link you will see that there are an amazing number of design options and they are all so colorful and fun.

IMG_8907

Untrimmed fabric

I made my fabrics into tea towels (described below), but my friend, Anne, made hers into adorable (and reversible) tote bags using this YouTube tutorial by Alanda Craft. The tutorial does not describe using a towel with a one way design such as these calendar towels. To have both sides of the bag facing “right side up”, you have to make a cut down the middle, reposition and sew back together.

Tote bags made from calendar fabric.

Tote bags made from calendar fabric.

All I had to do to make the towels was to trim the edges, iron 1/4″ towards the back once and then again, and then sew in place.

Edge stitch foot - Bernina foot #10

Edge stitch foot – Bernina foot #10

Sewing this edge was made easy with an edge stitch foot and my needle position changed slight to the right of center. As I sewed around all of the edges (from the back of the towel), I did add in a piece of twill tape to one corner to allow the towel to be hung over a hook if desired.

Twill tape in the corner

Twill tape in the corner makes the towel able to be hung on a hook or knob.

IMG_8917

Due to the bulk of the folded edge, I did have trouble getting my sewing machine to grasp and move the towel forward as I began sewing. This is what the Bernina height compensation tool is for.

Presser foot slanted up in the front causes feed dogs to not be able to advance the fabric.

Presser foot slanted up in the front causes feed dogs to not be able to advance the fabric.

In this next photo I have inserted the tool under the back of the foot (behind the start of the towel edge) which has leveled the presser foot and enabled the feed dogs to move the fabric.

Height compensation tool in place.

Height compensation tool in place – presser foot now level.

Height compensation tool.

Height compensation tool.


This tool has a swivel holding the 3 layers together which allows you to use 1, 2 or all 3 of the layers to get different thicknesses depending on what you’re sewing. I used 2 layers for these towels.

Finished towels

Finished towels


This was a fun project and makes a lovely gift. This cotton/linen fabric is fairly stiff when you receive it, but a quick wash turns it into a nice soft towel. I finished the edges before washing to prevent a lot of fraying that would have happened in the washer and dryer.

Happy New Year!


6 Comments

Filed under Gifts, Purses and Bags, Tutorials

Diaper bag

Diaper bag version of the Multi-Tasker Bag. Size is 12″ high, 14″ wide, 5″ deep.

xx

Trying out the length of the strap.

My daughter is due to have a baby soon and a friend asked if I was interesting in making a diaper bag as she wanted to make one for a friend of hers. I knew my daughter hadn’t bought or received one yet and I always love to do a project with a friend, so I agreed it would be a fun idea. We used a pattern from the book “Sew Serendipity BAGS” by Kay Whitt. This is the diaper bag version of the “Multi Tasker Bag” in the book.

Sew Serendipity BAGS by Kay Whitt

Sew Serendipity BAGS by Kay Whitt

This bag is not for the lighthearted! The pattern directions fill up 15 pages of the book and references several others. It was fun to make and to see come together, but it took 2 sessions together with my friend, a sewing retreat and several hours back at home to complete this bag.

Closed

Bag front with zippered  changing area zipped closed.

Unzipped

Unzipped. Pockets for diapers and wipes exposed.

Changing pad folded out. Velcro attaches it to the bag flap.

Changing pad folded out. Velcro attaches it to the bag flap.

The dark blue fabric here is PUL (polyurethane laminate) which is soft, breathable and waterproof. The changing mat detaches and can be used separately or really washed clean. I used Carolyn Friedlander’s fabric line called “Doe”. My daughter and her husband are engineer and architect and I thought this would appeal to them. They are having a son and I hope this fabric is “manly” enough for the father to not mind using for his son.

xx

Reverse side of the bag

The pocket on the back has a small piece of velcro as a closure on the envelope style flap. This is called a “media pocket” in the pattern directions. I think it is supposed to fit a phone or iPod type device but it is really not sized for today’s phones. I sewed a dividing stitch down the middle of this pocket but I am now thinking that if that is removed, a phone would fit sideways in this pocket – or in one of the side pockets!

Diaper bag

Carabiner on outside loop can hold keys, pacifier, rattle, etc.

A fabric loop is sewn into the outside binding to hold anything you really want to keep handy. I found this black carabiner and it is a bit large. The parents can change it out if they want something smaller.

xx

The bag top zips closed. When unzipped the top falls into the bag. Straps are attached with hardware to the sides of the bag which allows them to lay nicely out of the way.

The top has a separating zipper which falls into the bag when unzipped. The directions called for sewing the side edges of the top to the sides of the bag. This would allow the top to hold a boxier shape but I didn’t do it because I felt it would make it much more difficult to access the inside.

xx

The inside has an elasticized pocket on one side that is divided into 3 sections.

There is quite a bit of room on the inside and one long pocket.

I think this bag will be very useful. There are plenty of pockets for bottles, diapers and wipes, extra clothing and the parent’s phone, keys and wallet. Am I forgetting anything?

Pattern details and changes

1. This bag has a HUGE number of pieces to cut out – including fabric, fleece and interfacing. The only actual pattern piece in the book is the media pocket flap. Every other piece is given as height by width measurements. The book does not include a separate list of all the pieces together in one spot. It gives the measurements throughout the 15 pages of instructions as you come to that particular piece. I went through the pages of directions and made a cutting list and here it is:  Diaper bag cutting measurements.  You’re welcome! Thank you to Kay Whitt for her generous permission to include this is my post.

2. As mentioned above, I did not sew the zipper to the sides of the bag. If I made this again, I would use a longer zipper which would not separate at the end, but rather extend well beyond the end of the top flap so that the top would still fall into the bag when unzipped but you wouldn’t need to use both hands to get the zipper in place to start zipping it. (I hope that makes sense).

3. The bag’s stability is obtained by using Peltex for the body. It would be interesting to try something like “by Annie’s Soft and Stable” instead. The shape may not be as defined but it would be easier to sew and lighter weight when done. A piece of Peltex could still be used as an insert for the bottom of the bag. (If you use a softer stabilizer you can ignore my next 2 comments.)

4. Sewing the bottom of the bag to the sides is tough (again because of the stiff Peltex). On page 118 Step 4, the directions say that sewing this is “awkward” but “they will sew together with good result”. Good news! This is true!

5. Sewing the binding around the top of the bag through the Peltex is tough. I ended up sewing it by machine to the inside of the bag and then hand sewing it down on the outside. This worked well. It’s not that the Peltex is hard to sew through, it’s dealing with it in the round as you’re sewing that is difficult.

I hope my notes will help you if you make this bag. Have patience and persevere. It will be worth it!

6 Comments

Filed under Pattern review, Purses and Bags, Uncategorized

Sewtopia – Chicago


Lindsey and me at Sewtopia

Lindsey and me at Sewtopia

My daughter, Lindsey, and I spent this past weekend at a sewing event called Sewtopia which was held in Chicago. Sewtopia is a 3 day sewing retreat for the online sewing community which occurs 2 times a year in different places around the country. During the Spring retreat the focus is on education and we had 2 fabulous instructors!

Latifa Sattir

Latifah Saffir and our sewing space at the Drake Hotel

Latifah Saffir traveled from Los Angeles to teach us her Molehill Quilt design which is all curved piecing. The curves are rather long and shallow and sewing them was a breeze after Latifah gave us tips and showed us how to sew them.

Lindsey arranging her Molehill blocks.

Lindsey arranging her Molehill blocks.

Did I mention that Lindsey is pregnant? 37 weeks pregnant to be exact. She lives in the Chicago area and so did not travel out of her usual stomping ground to attend this event which we had signed up for longer than 9 months ago. She and Latifah are both engineers and Lindsey could really appreciate the engineering that went into this quilt design.

xx

The final layout was decided.

The “Molehills” are all made and then some of them are cut and repositioned such that you end up with a rectangular quilt with straight edges made from all of those curves. You have to admit, that is some engineering! The name comes from a play on the saying about “not making mountains out of molehills”. These arcs are large (24″ wide) but not tall and so they are definitely more like molehills than mountains. This pattern is due to be released by Latifah later this week. Click here to go to her website.

IMG_6556

12 pieced Molehills = baby sized quilt

I did a fair amount of prep work for a Molehill quilt top of my own but wanted to spend more time figuring out a layout. I decided to help Lindsey construct her blocks so that we would get to the assembly while the instructor was still available to guide us. So . . . I don’t have any molehills of my own to show right now.

The following day we had Rita Hodge from Red Pepper Quilts who came all the way from Melbourne Australia to teach us how to piece Y seams to make the Kansas Dugout block. This block is sewn together using many, many, many, Y-seams. Did I say “many”? No exaggeration! This looks rather simple but was like putting a puzzle together.

My finished pillow top. 22" square. Each block is 5.5"

My finished pillow top. 22″ square. Each block is 5.5″

Lindsey's finished pillow top.

Lindsey’s finished pillow top.

DCMQG members with Rita Hodge (in the middle)

DCMQG members with Rita Hodge (in the middle)

The photo above is Rita’s quilt which is made up of 100 Kansas Dugout blocks. The templates for this block in 3 different sizes can be found on her website here and sewing directions are on her blog here.

Michael Miller Fabric Challenge fabrics

Michael Miller Fabric Challenge fabrics

The attendees of Sewtopia Chicago where issued a sewing challenge several weeks before the event. We were each sent 6 pieces of Michael Miller fabric and asked to create something quilted from them and bring it to the event to be shown all together and a few would be chosen by judges to win prizes.

Lindsey's entry into the Michail Miller Fabric Challenge.

Lindsey’s entry into the Michail Miller Fabric Challenge.

You could add other Michael Miller fabrics to your piece. Lindsey ended up making a pretty large quilt. We were sewing the binding down right before we went to the opening registration where we had to turn our items in.

Michael Miller Fabric Challenge

Some of the items entered into the Michael Miller Fabric Challenge

My entry was the Dragon Fly quilt pictured above (and below) with just a few of the the other entries.

xx

My quilt: “Well Dressed Dragonflies”

During lunch the day of the judging the attendees requested to vote on their favorite of the challenge items and the staff agreed and made it happen. Guess which quilt won “viewers choice”? Mine! I thought the dragonflies were pretty cute, but it sure was great to know others did too. It is a paper pieced pattern by Amy Friend that can be found here.

I do not have photos of the items that won the judging. If the Sewtopia people post photos of them later I will edit them in. The winner made a bag with amazing piecing and the words of the song “Over the Rainbow” free motion quilted into it. Second place was a fabric iconic Airstream trailer and 3rd place was an adorable rag doll.

There were many other wonderful sponsors for this event including Bernina who provided sewing machines for many of the participants, Pellon who provided rolls of batting and Reliable who provided irons. The organizers and staff were all truly amazing.

DCMQG Members

I had so much fun with these ladies!

I didn’t realize there would be other DC sewers at the event, but found that there were 3 others when I got there. Kristina on the left above has moved to Chicago is now a student at Northwestern University. Stephanie and Lauren flew in from DC for the event and it was such a pleasure to get to know them better.

To say that it was a wonderful weekend is such an understatement that it seems stupid to even say it. I sewed, I learned new things, I met new people and I was with my daughter who lives much too far away from me and who’s life is about to change forever. I feel as though I’m the luckiest woman alive. To top it off – I’m going to yet another retreat this coming weekend! Mid Atlantic MOD will be happening in Lancaster, PA and I will be there with many of my friends (some feel like daughters) from the DC Modern Quilt Guild. I can’t wait!


5 Comments

Filed under Quilts, Sewtopia, Uncategorized

Dinosaur Baby Quilt


My dinosaur quilt and the soon to be parents.

My dinosaur baby quilt and the soon-to-be parents.

My daughter and her husband are expecting a baby boy in May and I wanted to make him a special quilt. My daughter suggested that I make one with a dinosaur theme. After doing an online search for ideas I found this wonderful quilt by Daniel Rouse titled Hero’s nemesis.

Quilt by Daniel Rouse

Quilt by Daniel Rouse (photo used with his permission)

I basically copied what Daniel had done except I used different colors and a different dinosaur.

I started by making a quilt top out of Disappearing Nine Patch Blocks.

Disappearing Nine Patch quilt top.

Disappearing Nine Patch quilt top.

I wanted my quilt to have a triceratops on it. My family has spent a lot of time in Montana and the Museum of the Rockies has a wonderful display of triceratops skeletons. I found a wall decal of a triceratops skeleton that was the right size and traced around it.

Tracing around the wall decal.

Tracing around the wall decal.

I then made a patchwork of half square triangles that was somewhat larger than this tracing.

xx

I used the product Thangles to make my half square triangles and they made the process go pretty quickly. They come in all sizes, but I used the 1 1/2″ size.

Thangles

Thangles

I then layered the grey quilt top wrong side up with the teal patchwork on top also with the wrong side up and then put the traced skeleton on top of that.

xx

I pinned these pieces together well and brought it to my sewing machine and stitched around all of the skeleton pieces using my free motion foot.

I stitched around each bone in the skeleton.

I stitched around each bone in the skeleton (twice).

I ended up sewing around each piece twice. I just was not confident that one line of stitching would be secure enough. I am not the best at free motion stitching!

After tearing the paper off, I turned the piece around and started to trim the grey away from inside each of the bones which exposed the teal patchwork underneath.

This is the fun part!

This is the fun part!

As you can see, this is a raw edge reverse appliqué technique.

xx

IMG_6087

I used some leftover fabric and HSTs to piece together a fun backing.

The back.

The back.

I knew that the quilting would not be very obvious due to how busy the grey top is. I did some straight line quilting in sort of a sunshine fashion arising from the dinosaur and then some landscape type quilting underneath and bound it in teal.

Finished quilt.

Finished quilt.

This quilt was so much fun to make. Thank you to Daniel Rouse for sharing his process on his blog. He has made several quilts using a stencil technique and each one is absolutely amazing and unique!

My hope is that this quilt will keep my new grandson warm and secure for years to come. I can’t wait to meet him!

Notes:  Stencil was 13 X 35″  Finished quilt is 41 X 54″.

14 Comments

Filed under Quilts