Category Archives: Pillows

Decorative Zipper Band on the Back of a Pillow

xx

Front and back of the same pillows

I love to make pillows and give them as gifts. It’s nice if the cover is removable so that it can be washed or changed out. I like to put in a zipper and to cover it with a contrast fabric band. It makes the back look as pretty as the front!

xx

Front

xx

Back

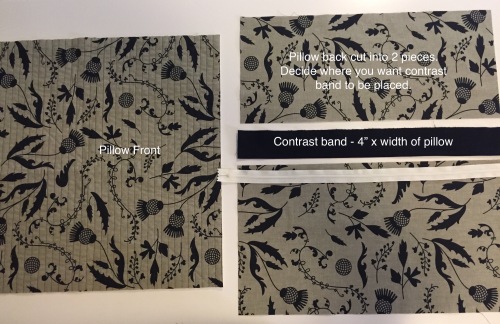
For an 18″ pillow start with:

  1. Pillow Front – this can be a single piece of beautiful fabric or an orphan quilt block or something you sew together specifically for who you are making the pillow for. This pillow front can be quilted or not. If you quilt it, you will want to add batting. If you don’t quilt it, depending on the weight fabric you use, you may want to interface it. For this example the front was cut 18″ x 18″ after quilting.
  2. Pillow Back – I cut the back the same width as the front (18″) and 1 inch longer than the front (19″).  18 wide x 19″ long. I fuse on the same size piece of interfacing (again based on fabric used),  and then make a horizontal cut where I want to add the contrast band that will hide the zipper.
  3. Contrast Band – One piece cut 4″ x the width of the pillow. For this pillow: 18″ wide x 4″ long.  I also interface this piece if it is quilting cotton weight. (I often use the same fabric that I will edge the pillow with.)
  4. Fabric for edging – 2 strips cut the whole width of the fabric. If I bind the edges of the pillow I cut these strips 2 1/4″ wide. If I am going to insert cording into the edge, I base the width on the size of the cord. Lately I’ve been using 6/32″ cotton filler cord and I cut the strips 1.5″ wide cut on the bias. I sew these 2 strips together using a diagonal join which gives me a single strip that is about 80″ long.
  5. Zipper – A plastic teeth (tooth?) zipper that is longer than the width of the pillow. In this case 20″ or longer.
  6. Pillow form – 18″ pillow form. This will be a little larger than the pillow cover which will make a nicely stuffed pillow.
xx

Project pieces as listed above – Front, back (divided into 2 pieces), band, zipper.


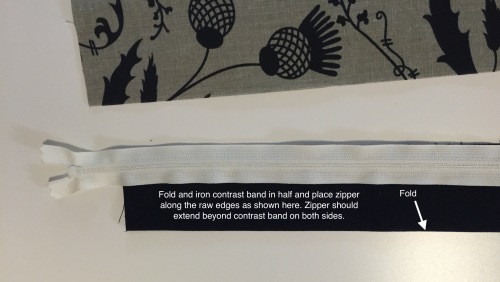
Fold the contrast band in half lengthwise with wrong sides together. This folded band is now 2″ x 18″.

xx

Zipper placed correctly on band. Zipper face down and extending beyond edges on both sides.


Place the zipper wrong side down along the raw edges of the folded contrast band. The extra length of the zipper should be sticking out on both ends. Baste in place

xx

Now attach the zipper and band to the pillow back top.


xx

Top of pillow back now looks like this.


Add this basted unit to the top piece of the pillow back, align the edges and pin in place. If you pin the way I have in the photo below, it will allow you to then open the zipper to sew this side of the zipper in place.

xx

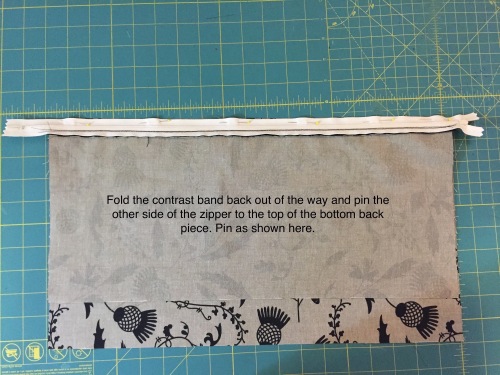
Place other side of zipper to bottom bottom and pin as shown above.


Sew the bottom of the pillow back to the other side of the zipper. There is no need to baste this side first. The right side of the zipper is sewn to the right side of the pillow back.

xx

Open zipper to make sewing easier.


xx

Zipper back almost done!


xx

This photo shows the zipper hiding under the contrast band.


xx

Move the zipper stop to the middle of the pillow and stitch along both sides.


xx

Trim zipper.

The back is now done. It should be trimmed to the same dimension as the front (18 x 18″). If you are going to bind the edges, the front and back are placed wrong sides together and basted around the edges. The binding is now applied to the edges to finish the raw edges.

xx

Binding on edges

If you are going to insert cording into the edges, cover the cording with bias cut fabric which allows the cording to go around the corners easily. This is sewn onto the right side of the pillow front and then the front and back are sewn together right sides together.

xx

Another pillow – front and back. Corded edges.

Happy Sewing!


5 Comments

Filed under Gifts, Pillows, Tutorials, Uncategorized

Sewing with Daughters

I am a lucky woman – I have three daughters. I sewed a lot of things for them when they were little.  This included not only dresses or other clothing to wear, but also costumes – dress up clothes, Halloween costumes, dance costumes and school or church play costumes.

My three daughters wearing Easter dresses I made them.

My three daughters wearing Easter dresses I made them. Circa 1990.

They saw me sew a lot of things and now as adults they all have sewing machines and can sew themselves – when and if they have the time! Sometimes I feel silly that I named my blog “I Finally Have Time”, because I actually never feel as though I have that much time to spend on sewing. However, compared to my young professional daughters – I do have much more time. Nothing pleases me more than to actually sew with them.

My youngest daughter, Megan, asked for a sewing day with me for her birthday in May. She wanted to make the Moneta Dress by Colette. We made plans to spend the day at the Finch Sewing Studio in Leesburg, VA where we knew we could purchase the pattern, some great fabric and have lots of space to work without the interruptions that come up at home. We also knew that if we got into trouble with sewing the pattern, Nicole would be there to bail us out. We have already taken a variety of classes from Nicole, but this time we decided to just use her wonderful sewing studio space. Although she does have classes coming up for this dress pattern!

Knit Moneta dress by Colette

Knit Moneta dress by Colette

I didn’t take any process photos and Nicole took this one right before we left for the day. Don’t you LOVE this polka dot dress! And those pockets! Megan did a great job putting it together and there were some tricky parts. Actually, it is not a tricky pattern, but if you chose the sleeveless version, the bodice is lined and there is a magical way of sewing it in which requires extra attention to the directions. Colette also provides a video link to the process for people like me who would like to see it done instead of just reading the instructions. The waist has a narrow clear elastic sewn onto the seam allowance which will keep the knit from stretching out of shape there.

A week later I met my oldest daughter, Lindsey, in Montana and she had a knit maxi skirt that she had bought last summer and some fabric that she wanted to use to try to replicate it. Here is the original skirt on her.

Stripes horizontal on the front and back with Chevron on the sides.

Stripes horizontal on the front and back with Chevron on the sides.

We did not have enough fabric to do those chevrons and so decided to run the stripes vertically on the sides. This had an added benefit of not having to match the stripes. Here is the result:

New skirt

New skirt

The waistband of the purchased skirt looks like this on the inside:

xx

Inner waistband and elastic

There is a strip of clear elastic sewn into the seam allowance of the waist – just like with the dress above! Do you see the line of stitching about an inch below the top of the waistband? That is where a second strip of elastic is sewn inside the waistband. As nice as it is to have a knit waistband, my experience is that cotton knit fabric does stretch and it is nice to have the security of that extra elastic. We did not have access to clear elastic but where able to find 1/2″ white elastic to sew into the new skirt. It worked perfectly. The side seams of the waistband also had some elastic in them to cinch the sides which looked nice.

Cinched side seams.

Cinched side seams.

If only we had one more clothespin!

If only we had one more clothespin!

Lindsey happily left for home a few days later wearing this skirt.

I don’t know when I’ll have a chance to sew with my middle daughter, Sandy, but I hope it is soon. Most of the sewing she has done recently is to make pillows which she sells. She has a process to create a stencil using her computer and a Silhouette cutting machine. She can take words that are meaningful to someone and “paint” (actually ink) them onto fabric and then create a pillow. Below is one of three pillows she made for my brother and sister and me regarding our childhood summer home commonly referred to as “camp”.

Front

Front

Back (zipper hidden underneath)

Back (zipper hidden underneath)

My family will all be gathered at camp soon and can not wait to get there!


8 Comments

Filed under Family, Garment sewing, Pillows

Studio Gatz – handcrafted gifts and more!

Check out Studio Gatz.  My daughter, Sandy,  just opened this online store and it has some wonderful handcrafted items including cards, pillows, glassware and dishtowels.  She is also mixing in some vintage items. If you need a special gift, this is the perfect place to look.

Studio Gatz

Studio Gatz – Vintage Finds & Classic Designs

I was the pillow maker this past week.  These pillows are made out of linen or other textured fabrics.  I covered the cording and added it to the edges (I was told the pillows HAD to have this).  Most have a hidden zipper in the back with a decorative fabric strip doing the hiding.  Sandy wasn’t sure she would like the look of this but we both loved it once I did the first one.

Linen Hexagon Pillow

Linen Hexagon Pillow – Front

Linen Hexagon Pillow - Back

Linen Hexagon Pillow – Back

I used this tutorial from Sew Mama Sew to insert the zipper.  It made the zipper a breeze and so beautiful.  I  think the back looks just as good as the front.  Don’t you?

Black Hexagon Pillow Front

Black Linen Hexagon Pillow

Back of pillow – hidden zipper

1 Comment

Filed under Family, Pillows, Uncategorized