Tag Archives: zippered pouch

I’m with her – quilt block template


img_1556

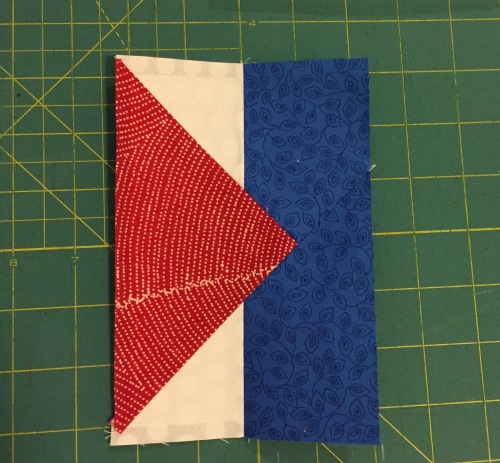
Finished and quilted block

I wanted to make a zippered pouch with Hillary Clinton’s “I’m with her” logo on it. My friend, Dana, had made and posted some she made on Instagram (danaandthread).

img_1559-1Aren’t they great? I love these! She made hers using the block instructions from Maritza Soto (sotosewn on IG) who has a free pattern on Craftsy. The directions are for a 15 x 18″ block and reducing it didn’t seem to be a simple matter (for me) and so I decided to try to paper piece it in a smaller size.

Template for 8.5 x 9.5″ block. Obviously the finished size could be altered by the width of the outside pieces (#2, 4, 11, 12, 13).

You can download this template by clicking here: I’m with her.  I made mine using freezer paper piecing. I printed the template on freezer paper and cut it apart. (Note that there is a 1″ mark in the center of piece #10 to be sure it printed to scale.)

Templates ironed onto the wrong side of my fabrics

Templates held right sides together, ready to be sewn right along the paper template.

Sewn and pressed toward the darker fabric.


img_1543

Pieces #1 – 5 were the only “tricky” pieces to align.

I used registration marks on the paper to help line them up for sewing (note the red and blue marks). Although I did piece this one entire block using the paper templates for the purposes of this tutorial, pieces 6 thru 13 could be cut & sewn in a conventional manner. Pieces 6 -9 are 2″ square finished or 2.5″ square unfinished, etc.


Above is a flipagram showing how the block went together.  This was a fun and easy way to make this block.

img_1557

image

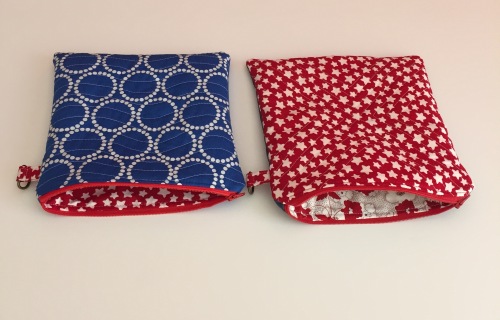
Finished pouches

image

Do you have an even easier way to make up this block? Let me know in the comments.


16 Comments

Filed under Purses and Bags, Uncategorized

Wide Open Pouch

The Wide Open Pouch is a free pattern by Anna Graham, aka Noodlehead. I liked the idea of having a bag that is easy to get into and it looked like it might be a quick sew. Instructions for cutting a 2 color bag are here. First I made one:

First Wide Open Pouch

First Wide Open Pouch (both sides)

Then I made four more. It was just so much fun to pull different fabrics to sew these. These are all the Medium size pouch and are roughly 11″ wide x 6″ tall x 4″ deep.

I altered the directions for my bags by using fusible batting and quilting them. This gives a much sturdier bag than if they are just interfaced – and the quilting also adds another design element. If you decide to quilt one of these, you will quilt it with just the exterior fabric and the batting. Do not make a “sandwich” with the lining. The lining is added separately later.

xx

The original pouch and four more

With Anna’s permission, I am donating these to my traditional quilt guild, Needlechasers of Chevy Chase, to be sold at their upcoming Quilt Show in October to support the guild. I posted this photo on Facebook and several friends and family wanted one. I decided to go ahead and “pre-sell” the ones that I was asked about. However, then I felt as though I should make some more.

I attended a DC Modern Quilt Guild meeting that was held at the Finch Sewing Studio this past weekend. While there I bought some of the new fabric from Cotton + Steel. Perfect to use for more pouches! (I may have bought most of the fabrics that were primarily turquoise.)

xx

Pouches made out of Cotton + Steel fabric. Exterior fabric.

I love those horses! I couldn’t resist these different combinations. More fun fabrics on the inside too.

Inside of pouches.

Inside of pouches.

One of my daughters told me she wants a new make up bag and so I had to make a pouch for her – but these are way too colorful – she doesn’t like bright colors. So I made her what I think is a very classy bag that is grey and black and she does like polka dots – who doesn’t? (She can let me know if this is acceptable or not after I post this).

xx

Pouch # 9

I made the original bag with a friend who then urged me to try the Zippy Strippy pouch pattern by Atkinson Designs. Today I made up the medium size of that pattern which costs $8. I used a mini charm pack that I’ve had for awhile to make the fabric for the outside of the pouch.

xx

This bag is a little smaller than the Wide Open Pouch.

xx

The Atkinson bag is a little smaller.

xx

Different finishes inside.

Pouch comparison:

The Noodlehead pattern is free, the top does open wide and so it is easy to find what you’re looking for inside, and it is fully lined. Due to the way it is constructed, you can top stitch around the entire top of the pouch after it is made which makes everything lie nicely around the zipper.

The Atkinson bag is a paper pattern (not a download) that is for sale, the top has a pretty finish using a fabric tab at the ends of the zipper but the inside has exposed seams which have to all be finished with a zig-zag stitch to prevent raveling.

I’ve made 10 pouches at this point and can’t wait to make some more – but maybe not right away. This may be my “go-to gift” for the holidays this year.

9 Comments

Filed under Pattern review, Purses and Bags

Hexagon Zippered Pouch

I made up a little pouch yesterday.

Hexagon pouch made with Riley Blake Fabric

Hexagon pouch made with Riley Blake Fabric

The Modern Quilt Guild provided 6 fat eighths of this Riley Blake Fabric and challenged its members all around the world to make something from them and post a picture by Feb. 17th.

DCMQG's group of fabric for the Riley Blake fabric challenge

DCMQG’s group of fabric for the Riley Blake fabric challenge

The rules are simple – you can make anything that is quilted using these fabrics or any Riley Blake fabric and you can also add in any solids that you wish to.

Back of pouch

Back of pouch

I just wanted to make something up with the bundle we were given. I used the whole piece of the solid grey for the outside and a white and grey stripe for the inside. I simply cut the grey piece in half and quilted both halves.

Quilted wavy lines and added some leaves to one line just for fun.

Quilted wavy lines and added some leaves to one line just for fun.

I then made English Paper Pieced hexagons out of the other 4 fabrics into 2 flowers and appliquéd them onto the outside. 

EPP hexagon flower

EPP hexagon flower in progress

I wanted this flower to be flowing off the edge.

I wanted this flower to be flowing off the edge.

I inserted the zipper using my favorite technique of using little fabric tabs on both sides of the cut zipper to make the final product all neat and tidy. How this works is that there doesn’t end up being any zipper parts caught in the sewn side seam. In fact, I try to make it such that the fabric tabs aren’t caught there either.

Zipper inserted. You can't see it here, but the lining is also attached at this point.

Zipper inserted. You can’t see it here, but the lining is also attached at this point.

I had intended to make a flat bag, but right at the very end of sewing it up, I decided to box the bottom corners so that the bag would stand up.

xx

Boxed corners on the bottom

This kind of messed with my hexagon flower placement, but I do think it makes the bag more useful.

IMG_4053

10 Comments

Filed under DC Modern Quilt Guild, Gifts, Purses and Bags