
This is the Lazy Daisy block designed by Amy Gay of Butterfly Angels Quilts. It is a free foundation pieced pattern that I thought would make a great block for a Sewing Bee that I am currently involved in with the DC Modern Quilt Guild. This is the first time that I’ve joined a Sewing Bee. 5 of us have been grouped together and each month one of us asks the other 4 to sew up a few blocks using the pattern and fabric selection of our choice. We can provide fabric or ask for the others to sew from their stash. My hive will be sewing for me in February.
If you are making a block for me, either because you’re in my hive, or just because you’re my friend and know I would love to have a block from you, please read through this entire post before starting. I’d like to make sewing this block as simple as possible and I hope the info and photos here will save you some time. Thank you in advance!!
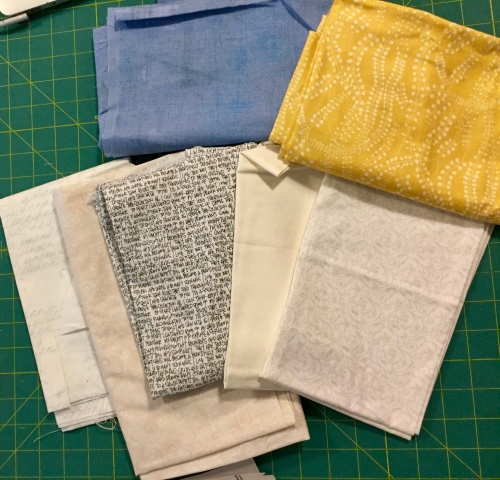
My fabric selection
I am going to ask for white or light cream solids or low volume prints for the daisy petals. I would like blue sky colored fabric for the background and prefer solids, or like-solids, although I can see how some prints might work well too – I just don’t seem to have them in my own stash. I would like these to be any value of a blue you could imagine in the sky. True blues, even navy but not aqua or turquoise. Finally, I would like the centers to be yellow and/or gold.
 A word about paper: I like to use Carol Doak’s Foundation Paper. It is a thin paper that you can somewhat see through that tears away easily when you are done.
This pattern consists of 1 title page and 4 pattern pages. The only directions are what is printed on the title page as the “sewing order”. After making up the block myself, I thought it would be helpful to my bee-mates to have more instruction. I found the block easy to sew once I figured out a few logistics. The petals are each pieced separately and then joined together.
The first step was to rough cut around each of the paper pieces. Petal D has to be taped together. I went ahead and precut my fabric into the following size pieces:
White: (4 pieces) 3 x 8″ and (2) 4 x 8″
Blue background: (2) 3″ squares cut diagonally, (2) 4″ squares cut diagonally, (4) 3 x 8″, (2) 4 x 6″ To be honest – I didn’t cut enough blue at first and had to cut more.
Yellow/gold: (3) 3″ squares
Each petal piece (A thru H) starts with a white fabric strip glued onto the back side of the paper. The wrong side of the fabric is glued to the wrong side of the paper. I used an Elmer’s purple washable glue stick which worked like a dream. It goes on purple but dries clear. It holds the fabric to the paper through all the sewing and trimming but peels right off at the end.

Put a good amount of glue onto the back of the paper where the white fabric strip will be placed and then . . .
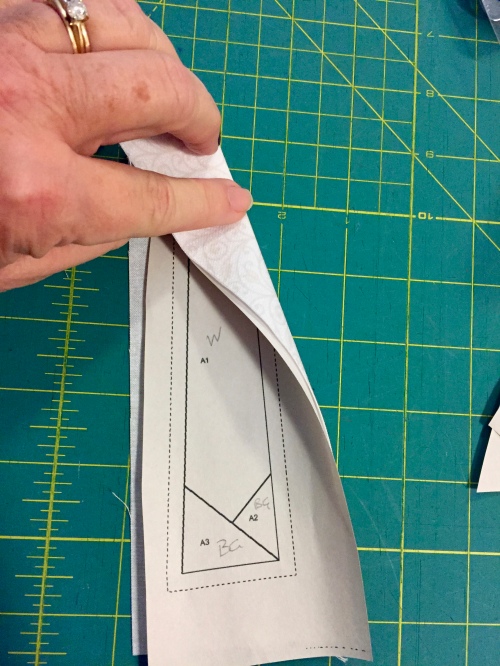
. . . glue the wrong side of the white fabric piece to it. Cover the whole A1 area.

I like to make a crease where the sewing line is going to be. (Between A1 and A2 in this example)

Place a blue fabric piece (right sides together) over that crease such that when sewn and ironed in place, it will cover A2 on the paper.

I shortened my sewing stitch to 2.0 and sewed as shown. I sewed through the marked seam allowance and I did sew just one stitch into A3.
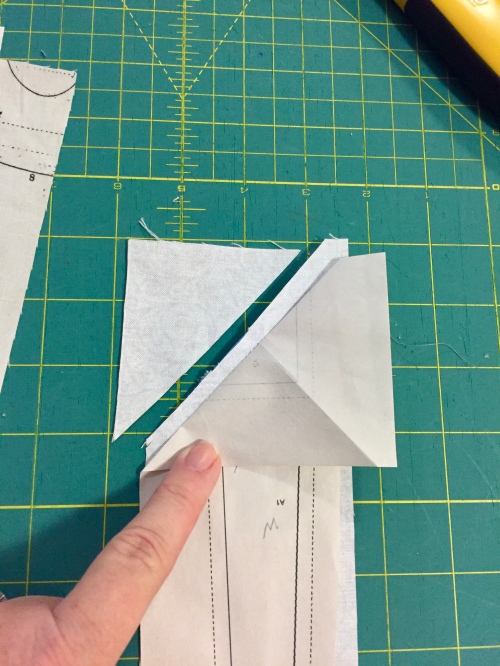
Leaving the fabric exactly as sewn, fold the paper only back along the stitching line and trim to a 1/4″ seam allowance. Now you can iron the blue fabric into place.

Crease along the next sewing line

Place the next blue piece

Sew the line between A2 and A3
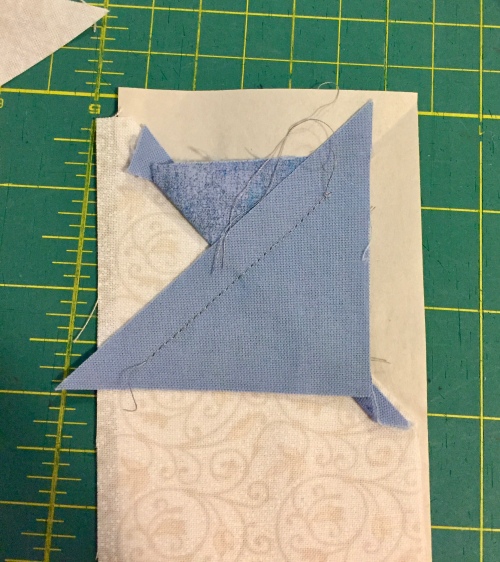
This shows what the right side looks like after sewing

Again, leaving the fabric as sewn, fold back the paper only along the stitching line and time leaving 1/4″ seam allowance.

Press the blue piece back into place

Now trim along all of the dotted lines on the paper

Right side of trimmed piece

Once the A & B petals have been pieced and trimmed, they can be sewn together. Glue the yellow fabric to the paper piece C1, trim it and then sew this onto the AB piece.

I like to line up each of 2 pieces that are going to be sewn together by placing them right sides together and then inserting a pin through the ends of the seam lines to make sure they are exactly lined up correctly. I did not get a photo of this.
Also – you do have to make sure you are joining the pieces along the correct seam line. The photo above shows the correct orientation of these 3 pieces. A is on the bottom when looking at this from the right side. B is on top in this photo.
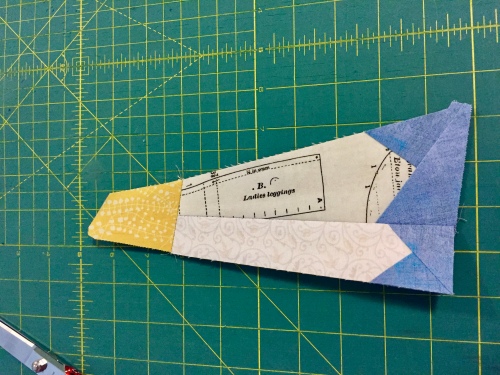
Repeat the process with D-E-F and G-H-I and then join them together. (see note below about removing paper from seam allowances after sewing)

I did remove the paper from the narrow seam allowances after sewing and pressed those seam allowances open to help the block lay flatter. I removed the paper from the seam allowance of A & B before sewing C to it, etc.

If you are in my hive, I would like to supply you with the printed papers for 2 blocks and a glue stick. If I do not see you at an upcoming meeting, I will mail these to you. Please leave the paper in place when you return the blocks to me. I will remove it when I sew the quilt together.
If you are not in my bee but are willing to make a block for my quilt, I would be absolutely overjoyed to have more blocks! I can also provide you with the papers and glue if you ask me or you can use your own.
Thank you!


I’ll make you one! As soon as I started reading I thought that…and then the invitation was there!
Wonderful Lynne! I’ll give you the paper and glue on Saturday. I was able to buy 12 glue sticks and have them mailed to me for some ridiculous price (like $5) on Amazon, so I have plenty.
Sent from my iPhone
>
Wow! You really worked hard on putting these exceptional directions together. I would love to do one for you, but don’t know if I have the expertise! If you have a full hive, I’ll pass, but if there’s room for an extra, bring it on. Donna
Sent from my iPad
>
I’d love to have a block from you Donna. Maybe I could show you how to get started on it at the next NCCC Sit & Sew. Once you get started, it goes easily. See if you have some suitable fabric. If you don’t, please don’t buy any. This is a scrap using project.
Sent from my iPhone
>