Category Archives: Purses and Bags

I’m with her – quilt block template


img_1556

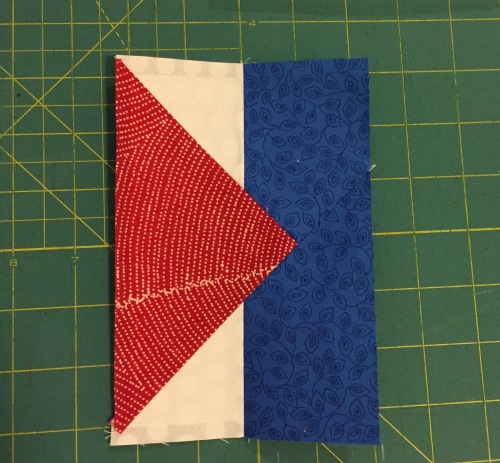
Finished and quilted block

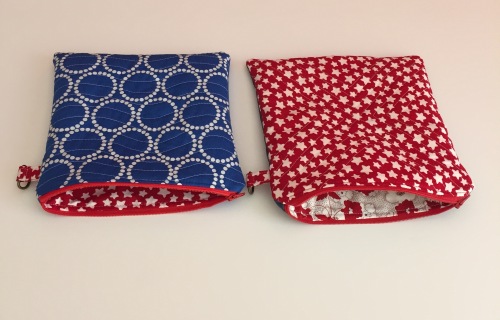
I wanted to make a zippered pouch with Hillary Clinton’s “I’m with her” logo on it. My friend, Dana, had made and posted some she made on Instagram (danaandthread).

img_1559-1Aren’t they great? I love these! She made hers using the block instructions from Maritza Soto (sotosewn on IG) who has a free pattern on Craftsy. The directions are for a 15 x 18″ block and reducing it didn’t seem to be a simple matter (for me) and so I decided to try to paper piece it in a smaller size.

Template for 8.5 x 9.5″ block. Obviously the finished size could be altered by the width of the outside pieces (#2, 4, 11, 12, 13).

You can download this template by clicking here: I’m with her.  I made mine using freezer paper piecing. I printed the template on freezer paper and cut it apart. (Note that there is a 1″ mark in the center of piece #10 to be sure it printed to scale.)

Templates ironed onto the wrong side of my fabrics

Templates held right sides together, ready to be sewn right along the paper template.

Sewn and pressed toward the darker fabric.


img_1543

Pieces #1 – 5 were the only “tricky” pieces to align.

I used registration marks on the paper to help line them up for sewing (note the red and blue marks). Although I did piece this one entire block using the paper templates for the purposes of this tutorial, pieces 6 thru 13 could be cut & sewn in a conventional manner. Pieces 6 -9 are 2″ square finished or 2.5″ square unfinished, etc.


Above is a flipagram showing how the block went together.  This was a fun and easy way to make this block.

img_1557

image

Finished pouches

image

Do you have an even easier way to make up this block? Let me know in the comments.


16 Comments

Filed under Purses and Bags, Uncategorized

2016 Calendar Tea Towels

Linen/cotton fat quarters from Spoonflower

Linen/cotton fat quarters from Spoonflower

This is an easy project to welcome in the New Year. I bought these tea towels online from Spoonflower. They aren’t actually towels yet in this photo because the fabric edges are raw and fraying. If you click on this Spoonflower link you will see that there are an amazing number of design options and they are all so colorful and fun.

IMG_8907

Untrimmed fabric

I made my fabrics into tea towels (described below), but my friend, Anne, made hers into adorable (and reversible) tote bags using this YouTube tutorial by Alanda Craft. The tutorial does not describe using a towel with a one way design such as these calendar towels. To have both sides of the bag facing “right side up”, you have to make a cut down the middle, reposition and sew back together.

Tote bags made from calendar fabric.

Tote bags made from calendar fabric.

All I had to do to make the towels was to trim the edges, iron 1/4″ towards the back once and then again, and then sew in place.

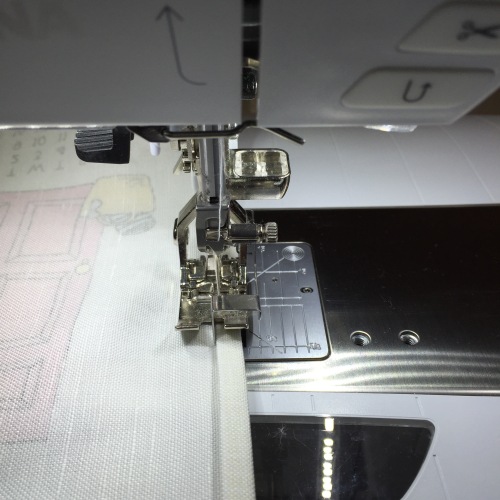
Edge stitch foot - Bernina foot #10

Edge stitch foot – Bernina foot #10

Sewing this edge was made easy with an edge stitch foot and my needle position changed slight to the right of center. As I sewed around all of the edges (from the back of the towel), I did add in a piece of twill tape to one corner to allow the towel to be hung over a hook if desired.

Twill tape in the corner

Twill tape in the corner makes the towel able to be hung on a hook or knob.

IMG_8917

Due to the bulk of the folded edge, I did have trouble getting my sewing machine to grasp and move the towel forward as I began sewing. This is what the Bernina height compensation tool is for.

Presser foot slanted up in the front causes feed dogs to not be able to advance the fabric.

Presser foot slanted up in the front causes feed dogs to not be able to advance the fabric.

In this next photo I have inserted the tool under the back of the foot (behind the start of the towel edge) which has leveled the presser foot and enabled the feed dogs to move the fabric.

Height compensation tool in place.

Height compensation tool in place – presser foot now level.

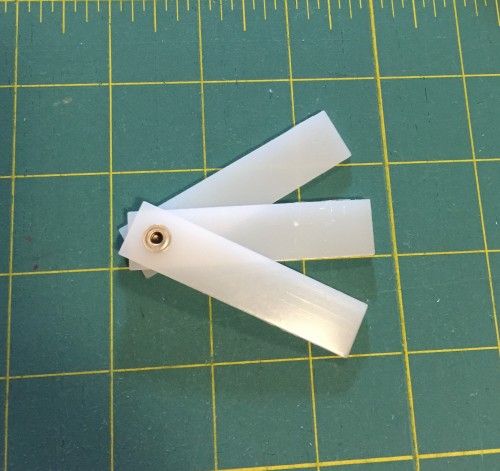
Height compensation tool.

Height compensation tool.


This tool has a swivel holding the 3 layers together which allows you to use 1, 2 or all 3 of the layers to get different thicknesses depending on what you’re sewing. I used 2 layers for these towels.

Finished towels

Finished towels


This was a fun project and makes a lovely gift. This cotton/linen fabric is fairly stiff when you receive it, but a quick wash turns it into a nice soft towel. I finished the edges before washing to prevent a lot of fraying that would have happened in the washer and dryer.

Happy New Year!


6 Comments

Filed under Gifts, Purses and Bags, Tutorials

Diaper bag

Diaper bag version of the Multi-Tasker Bag. Size is 12″ high, 14″ wide, 5″ deep.

xx

Trying out the length of the strap.

My daughter is due to have a baby soon and a friend asked if I was interesting in making a diaper bag as she wanted to make one for a friend of hers. I knew my daughter hadn’t bought or received one yet and I always love to do a project with a friend, so I agreed it would be a fun idea. We used a pattern from the book “Sew Serendipity BAGS” by Kay Whitt. This is the diaper bag version of the “Multi Tasker Bag” in the book.

Sew Serendipity BAGS by Kay Whitt

Sew Serendipity BAGS by Kay Whitt

This bag is not for the lighthearted! The pattern directions fill up 15 pages of the book and references several others. It was fun to make and to see come together, but it took 2 sessions together with my friend, a sewing retreat and several hours back at home to complete this bag.

Closed

Bag front with zippered  changing area zipped closed.

Unzipped

Unzipped. Pockets for diapers and wipes exposed.

Changing pad folded out. Velcro attaches it to the bag flap.

Changing pad folded out. Velcro attaches it to the bag flap.

The dark blue fabric here is PUL (polyurethane laminate) which is soft, breathable and waterproof. The changing mat detaches and can be used separately or really washed clean. I used Carolyn Friedlander’s fabric line called “Doe”. My daughter and her husband are engineer and architect and I thought this would appeal to them. They are having a son and I hope this fabric is “manly” enough for the father to not mind using for his son.
xx

Reverse side of the bag

The pocket on the back has a small piece of velcro as a closure on the envelope style flap. This is called a “media pocket” in the pattern directions. I think it is supposed to fit a phone or iPod type device but it is really not sized for today’s phones. I sewed a dividing stitch down the middle of this pocket but I am now thinking that if that is removed, a phone would fit sideways in this pocket – or in one of the side pockets!

Diaper bag

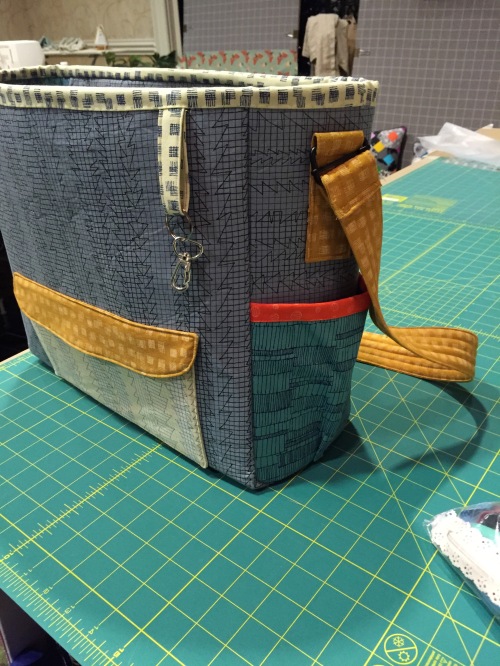
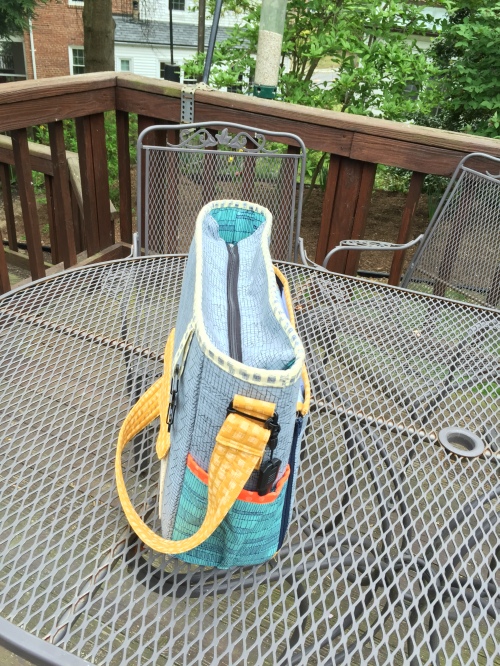
Carabiner on outside loop can hold keys, pacifier, rattle, etc.

A fabric loop is sewn into the outside binding to hold anything you really want to keep handy. I found this black carabiner and it is a bit large. The parents can change it out if they want something smaller.
xx

The bag top zips closed. When unzipped the top falls into the bag. Straps are attached with hardware to the sides of the bag which allows them to lay nicely out of the way.

The top has a separating zipper which falls into the bag when unzipped. The directions called for sewing the side edges of the top to the sides of the bag. This would allow the top to hold a boxier shape but I didn’t do it because I felt it would make it much more difficult to access the inside.

xx

The inside has an elasticized pocket on one side that is divided into 3 sections.

There is quite a bit of room on the inside and one long pocket.

I think this bag will be very useful. There are plenty of pockets for bottles, diapers and wipes, extra clothing and the parent’s phone, keys and wallet. Am I forgetting anything?

Pattern details and changes

1. This bag has a HUGE number of pieces to cut out – including fabric, fleece and interfacing. The only actual pattern piece in the book is the media pocket flap. Every other piece is given as height by width measurements. The book does not include a separate list of all the pieces together in one spot. It gives the measurements throughout the 15 pages of instructions as you come to that particular piece. I went through the pages of directions and made a cutting list and here it is:  Diaper bag cutting measurements.  You’re welcome! Thank you to Kay Whitt for her generous permission to include this is my post.

2. As mentioned above, I did not sew the zipper to the sides of the bag. If I made this again, I would use a longer zipper which would not separate at the end, but rather extend well beyond the end of the top flap so that the top would still fall into the bag when unzipped but you wouldn’t need to use both hands to get the zipper in place to start zipping it. (I hope that makes sense).

3. The bag’s stability is obtained by using Peltex for the body. It would be interesting to try something like “by Annie’s Soft and Stable” instead. The shape may not be as defined but it would be easier to sew and lighter weight when done. A piece of Peltex could still be used as an insert for the bottom of the bag. (If you use a softer stabilizer you can ignore my next 2 comments.)

4. Sewing the bottom of the bag to the sides is tough (again because of the stiff Peltex). On page 118 Step 4, the directions say that sewing this is “awkward” but “they will sew together with good result”. Good news! This is true!

5. Sewing the binding around the top of the bag through the Peltex is tough. I ended up sewing it by machine to the inside of the bag and then hand sewing it down on the outside. This worked well. It’s not that the Peltex is hard to sew through, it’s dealing with it in the round as you’re sewing that is difficult.

I hope my notes will help you if you make this bag. Have patience and persevere. It will be worth it!

6 Comments

Filed under Pattern review, Purses and Bags, Uncategorized

Orange Peel Pouch

Pouch for the Stitch It Swap

Pouch for the Stitch It Swap

I joined a swap last month. Jennifer Mathis who blogs at Ellison Lane posted that she and Lindsey Rhodes from LR Stitched were going to host a pouch swap. I would have 6 weeks to make and send a pouch. I don’t enter a lot of swaps because I don’t enjoy the pressure of it. You have to try to guess from a few photos and their social media sites what someone else would like and you want to do your very best work.

xx

Also, there is obviously a timeline. Aka deadline! I’ve been making so many pouches lately though, that I thought that this swap would be fun. The 6 weeks was key because I was about to take a road trip for 3 of those weeks. That trip gave me time to think about what I might want to make.

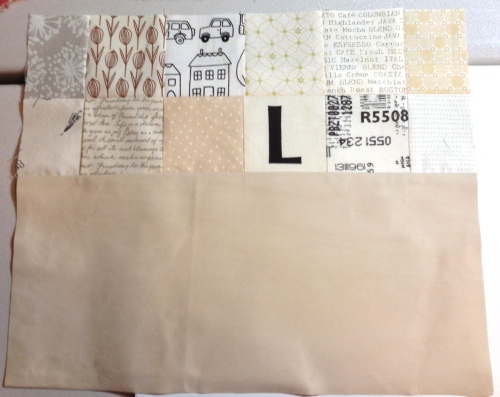
Low volume fabric squares for the top and leather for the bottom

Low volume fabric squares for the top and leather for the bottom

I decided to make the largest size of the Open Wide Pouch by Noodlehead. This is a free pattern on her blog and I LOVE it. It’s easy to make and it does open wider than other pouches which makes it easier to find things inside. I’ve made a lot of the medium size bag, but hadn’t tried the larger size. This was my chance.

Squares all sewn together and then cut to the width of the leather.

Squares all sewn together and then cut to the width of the leather.

I decided to use a piece of creamy colored (and feeling) leather that I had bought years ago. This might make the pouch more “special”. I had just enough leather to cut four pieces in order to make two pouch bottoms. I know so many “sewists” who make something for a swap and then have trouble giving it away because they love it so much. Not me! I made myself one too!

Top and bottom sewn together

Top and bottom sewn together

I’ve been noticing and loving a few quilts and pillows I’ve seen recently that have low volume backgrounds with bright orange-peel shapes appliquéd on top. In fact, I just bought the new book Playful Petals by Corey Yoder which has this pillow project in it that is a good example of what has inspired me.

From the book Playful Petals by Corey Yoder.

From the book Playful Petals by Corey Yoder.

Adding the bright colors to my project sure did liven it up! I added the “peels” by fusing them in place with double sided fusible (Wonder Under) and then straight stitched around the edges after adding a layer of fusible batting to the whole backside. This stitching sort of disappeared in the darker colors but made the lighter colors stand out against the low volume background.

Straight stitching around edges.

Straight stitching around edges.

My swap partner’s flickr name is fatdoxiesstudio. I had to actually look up what “doxie” meant and it’s a slang term for dachshund. She did have some photos of her doxie on her flickr site and so I found some great fabric to put on the inside of the pouch. The little shirts on the dogs even sparkled.

Doxies and a great zipper.

Doxies and a great zipper.

I also added a zip pocket to the inside and used one of these lacy zippers to that.

All done and received by my swap partner.

All done and received by my swap partner.

Chen received this over the weekend and sent me a note on Instagram. I hope she puts it to good use! Is mine done? Of course not! But the sides are all pieced and it won’t be hard for me to finish it up. (when I finally have time!)

Addendum: I received this amazing pouch filled with fun office supplies (all sorts of post it notes, paperclips and “to do” lists) the day after I posted the pouch I made. Sonia made this fabulous pouch and it incorporates all of the things that I love! Thank you so much Sonia!

IMG_5572


Other side

Other side


Inside

Inside

12 Comments

Filed under Purses and Bags, Uncategorized

Wide Open Pouch

The Wide Open Pouch is a free pattern by Anna Graham, aka Noodlehead. I liked the idea of having a bag that is easy to get into and it looked like it might be a quick sew. Instructions for cutting a 2 color bag are here. First I made one:

First Wide Open Pouch

First Wide Open Pouch (both sides)

Then I made four more. It was just so much fun to pull different fabrics to sew these. These are all the Medium size pouch and are roughly 11″ wide x 6″ tall x 4″ deep.

I altered the directions for my bags by using fusible batting and quilting them. This gives a much sturdier bag than if they are just interfaced – and the quilting also adds another design element. If you decide to quilt one of these, you will quilt it with just the exterior fabric and the batting. Do not make a “sandwich” with the lining. The lining is added separately later.

xx

The original pouch and four more

With Anna’s permission, I am donating these to my traditional quilt guild, Needlechasers of Chevy Chase, to be sold at their upcoming Quilt Show in October to support the guild. I posted this photo on Facebook and several friends and family wanted one. I decided to go ahead and “pre-sell” the ones that I was asked about. However, then I felt as though I should make some more.

I attended a DC Modern Quilt Guild meeting that was held at the Finch Sewing Studio this past weekend. While there I bought some of the new fabric from Cotton + Steel. Perfect to use for more pouches! (I may have bought most of the fabrics that were primarily turquoise.)

xx

Pouches made out of Cotton + Steel fabric. Exterior fabric.

I love those horses! I couldn’t resist these different combinations. More fun fabrics on the inside too.

Inside of pouches.

Inside of pouches.

One of my daughters told me she wants a new make up bag and so I had to make a pouch for her – but these are way too colorful – she doesn’t like bright colors. So I made her what I think is a very classy bag that is grey and black and she does like polka dots – who doesn’t? (She can let me know if this is acceptable or not after I post this).

xx

Pouch # 9

I made the original bag with a friend who then urged me to try the Zippy Strippy pouch pattern by Atkinson Designs. Today I made up the medium size of that pattern which costs $8. I used a mini charm pack that I’ve had for awhile to make the fabric for the outside of the pouch.

xx

This bag is a little smaller than the Wide Open Pouch.

xx

The Atkinson bag is a little smaller.

xx

Different finishes inside.

Pouch comparison:

The Noodlehead pattern is free, the top does open wide and so it is easy to find what you’re looking for inside, and it is fully lined. Due to the way it is constructed, you can top stitch around the entire top of the pouch after it is made which makes everything lie nicely around the zipper.

The Atkinson bag is a paper pattern (not a download) that is for sale, the top has a pretty finish using a fabric tab at the ends of the zipper but the inside has exposed seams which have to all be finished with a zig-zag stitch to prevent raveling.

I’ve made 10 pouches at this point and can’t wait to make some more – but maybe not right away. This may be my “go-to gift” for the holidays this year.

9 Comments

Filed under Pattern review, Purses and Bags

Carol’s Convertible Purse

Purse!

Purse!

Backpack!

Backpack!

This project started with a fellow NeedleChaser guild member who showed her purse during “show and tell”. I thought it would be very handy to have a bag this summer that could also be worn hands free on my back. I bought the pattern and recruited a few friends to make it with me. This seems to be the best way for me to get something done these days.

Carol's Convertible Purse

Pattern and labels!

Boy, did I need those friends to get this done! The pattern is 12 pages long. There are a few variations you can chose which affect how and what you cut out. There are a lot of pieces and the very BEST thing about the pattern is the premade label sheet that you can see above. Most of the pieces are given as simple dimensions rather than pattern pieces and these labels made the chore of cutting everything properly much less daunting.

All of the pieces.

All of the pieces.

Of course, the reason there are a lot of pieces is the reason we like the bag – lots of pockets and a chance to use a couple (or more) coordinated fabrics for the outside.

xx

My fabric: Anna Maria Horner Pretty Potent

I used this pretty AMH fabric for the outside but found that Tula Pink’s fabric went well with it for the inside.

Mix of fabrics

Mix of fabrics

The four of us met one morning at 10 AM with our pieces all cut out and ready to sew. At 5 PM we had them almost done.

xx

Nearly complete

Who would have guessed it would take that long? I ALWAYS underestimate how long it is going to take for me to sew something. Do you?

We had to each finish up individually and a week later, we have all done it!

I love my bag!

I love my bag!

I think that I will use this bag a lot this summer.

Out and about

Out and about

Notes:

1. To begin, I found it helpful to highlight the cutting diagrams I was going to use, once I decided on the options given.

2. When the outside and the lining are both made, the directions tell you to iron in a 1/4″ fold and then  topstitch the two together. Lynne chose to leave an opening in her lining and sew the two parts together inside out which seemed to give a much cleaner finish. It still needed to be topstitched, but the bags are already sewn together when you do this.


4 Comments

Filed under Pattern review, Purses and Bags, Uncategorized

Mid Atlantic Mod – sewing retreat

I am just back from a 4 day sewing retreat held in Lancaster, Pennsylvania. Mid-Atlantic Mod was arranged as a gathering of three area modern quilt guilds – DC, Philadelphia and Central New Jersey (although there were a few members of other MQGs there as well).

DC Modern Quilt Guild members

DC Modern Quilt Guild members

What a weekend! It is such an absolute pleasure to get away and be with this group of quilters. For a “first time” event, it was extremely well planned by Katie, Jessica, and Andrew. The retreat started on Thursday and didn’t end until Sunday at 6 PM. Participants brought their own projects to sew but throughout the weekend, there were various optional activities that you could chose to do – or not.

There was a tote bag swap. We were given a yard of Robert Kaufman Essex Linen a few months ago to incorporate into a tote bag. On the night of the swap everyone who brought a finished tote bag, got one that someone else had made.

Tote bag swap!

Tote bag swap!

Tote bag that I made.

Tote bag that I made.

Tote bag that I received.

Tote bag that I received  – I love it!

There were 60 minute long workshops on Saturday and Sunday. I taught a workshop on English Paper Piecing. I love that modern quilters are interested in this age old technique. I believe that the reason for this is that it is such a portable project and doesn’t require any special or expensive equipment. Very intricate designs can be sewn together with just a simple hand stitch. Thank you to Paper Pieces.com and the Colonial Needle Company for donating supplies for my EPP workshop.

EPP hexagon "kit" donated by www.paperpieces.com

EPP hexagon “kits” donated by http://www.paperpieces.com

Needles and thread donated by the Colonial Needle Company

Needles and thread donated by the Colonial Needle Company

EPP - Old and new.

EPP – Old and new.

Click on Mid Atlantic Mod – English Paper Piecing to download a copy of the EPP handout that I made up for my workshop. I encourage anyone and everyone to give it a try!

There were 3 progressive quilt tops that were sewn during the retreat. Those participants that wished to work on one or more of these came prepared with a quilt block that met certain specifications and then those blocks were used to create a top as one person after another worked with them. Here are the final quilts:

Low volume with pops of color

Low volume with pops of color

Triangles

Triangles

Stripes and solids

Stripes and solids

These progressive quilts were not something that I wanted to work on, but it was VERY interesting to watch them change and grow over the course of 4 days. One lucky participant got to keep each one at the end of the retreat – I think that there was a random drawing of those who worked on one to decide who “won” it.

On Friday night there was a “mixer” and we were served hors d’oeuvres and cocktails made just for our group (with names like “seam ripper”) and persuaded to mix with each other by constant give aways being given to those who changed seats.

On Saturday night we had a pajama party and sewed in our PJs. The group made pillowcases for ConKerr Cancer.

Pillowcases made for ConKer Cancer.

Pillowcases made for ConKerr Cancer.

I traveled to the retreat with my friend Anne. While we were there one of the participants was selling a Featherweight sewing machine and Anne tried it out and ended up buying it.

Anne and her "new" sewing machine.

Anne and her “new” sewing machine.

We did so much sewing and had so much fun. Thank you so much to the organizers and sponsors. Let’s do it again next year!


5 Comments

Filed under DC Modern Quilt Guild, Purses and Bags

Hexagon Zippered Pouch

I made up a little pouch yesterday.

Hexagon pouch made with Riley Blake Fabric

Hexagon pouch made with Riley Blake Fabric

The Modern Quilt Guild provided 6 fat eighths of this Riley Blake Fabric and challenged its members all around the world to make something from them and post a picture by Feb. 17th.

DCMQG's group of fabric for the Riley Blake fabric challenge

DCMQG’s group of fabric for the Riley Blake fabric challenge

The rules are simple – you can make anything that is quilted using these fabrics or any Riley Blake fabric and you can also add in any solids that you wish to.

Back of pouch

Back of pouch

I just wanted to make something up with the bundle we were given. I used the whole piece of the solid grey for the outside and a white and grey stripe for the inside. I simply cut the grey piece in half and quilted both halves.

Quilted wavy lines and added some leaves to one line just for fun.

Quilted wavy lines and added some leaves to one line just for fun.

I then made English Paper Pieced hexagons out of the other 4 fabrics into 2 flowers and appliquéd them onto the outside. 

EPP hexagon flower

EPP hexagon flower in progress

I wanted this flower to be flowing off the edge.

I wanted this flower to be flowing off the edge.

I inserted the zipper using my favorite technique of using little fabric tabs on both sides of the cut zipper to make the final product all neat and tidy. How this works is that there doesn’t end up being any zipper parts caught in the sewn side seam. In fact, I try to make it such that the fabric tabs aren’t caught there either.

Zipper inserted. You can't see it here, but the lining is also attached at this point.

Zipper inserted. You can’t see it here, but the lining is also attached at this point.

I had intended to make a flat bag, but right at the very end of sewing it up, I decided to box the bottom corners so that the bag would stand up.

xx

Boxed corners on the bottom

This kind of messed with my hexagon flower placement, but I do think it makes the bag more useful.

IMG_4053

10 Comments

Filed under DC Modern Quilt Guild, Gifts, Purses and Bags

Winter Tweed Boston Bag

xx

I made this wool bag for one of my daughters for Christmas this year. It is from the book “Carry Me – 20 Boutique Bags to Sew” by Yuka Koshizen. I bought the book after seeing the bag from the cover made up at a quilt shop in Hawaii. However, after buying the book I fell in love with this Boston Bag and knew my daughter who works in Boston would love it.

xx

This bag was quite an accomplishment. Just gathering the materials needed to make it was somewhat of a challenge.  I bought the tweed wool and then the lining fabric. That was the easy (and fun!) part.

Inside of bag.

Yellow for the inside!

Then I bought the 12″ Tubular Frame (Item 912) from Ghee’s online.  I thought I was ready to go. As I got started I saw that the pattern called for purse feet on the bottom. That seemed like a good idea but I couldn’t find any locally so back online I went.

Antique brass purse feet

Antique brass purse feet

I ended up ordering from BuckleGuy.com. I had to decide what color metal hardware to order. The internal frame doesn’t show except for the hinges which are brass. I didn’t want shiny brass feet or handle hardware and so I chose antique brass. These small antique brass feet (B1615) require a back post to attach them.

Close up. Aren't they pretty?

Close up. Aren’t they pretty?

The back post (B1414) comes in different lengths and so I had to guess what thickness the bottom of the bag would be. They only cost about 8 cents each so I ordered a couple different sizes. I ended up using the 3/8″ size which worked well. My bag bottom had 2 layers of interfaced fabric (wool and lining), a layer of foam stabilizer which gives this bag it’s structure, and 2 layers of stiff Peltex that was cut just the size of the bag bottom.

xx

After all of that, I couldn’t find leather handles locally. I could find some synthetic leather handles that looked pretty nice, but after spending all of this money on all of the other materials, was I really going to settle for less than leather? And believe me, this daughter would notice – immediately! I needed dark brown leather, 20″ long with antique brass hardware and the ability to attach to the bag. I bought these from Pursesuppliers on Etsy. I did like that they sewed on rather than having to use a single rivet. I just feel as though they can handle the weight of whatever gets put into the bag better this way. And believe me, a LOT can fit in this bag!

xx

Pockets on both sides.

Once I had the fabric cut and all of the supplies gathered, it was summer! I kept everything together and put it all away for months.

xx

The directions for this bag are very minimal. You have to read and look at small diagrams and I don’t think they are very clear. I would not want a beginner sewist or someone who hasn’t put several handbags together before to make an attempt at anything in this book. I had to make my best guess at much that I did. Having said that, though, the whole bag is one piece of fabric, and so it is very cleverly put together. It’s all about that internal frame.

xx

I am so glad to finally have completed this bag! I think my daughter is going to love it – I really hope so.

11 Comments

Filed under Gifts, Pattern review, Purses and Bags, Uncategorized

Barbados Bag

I just finished making the Barbados Bag by Pink Sand Beach Designs

Barbados Bag

Barbados Bag

The finished size is approximately 10″ wide by 11″ tall which makes it a pretty good size for an everyday bag. I’ve had the pattern for awhile but was a bit overwhelmed after looking at the directions and hadn’t taken the plunge to give it a try. Thankfully while shopping last week with a friend, she saw the bag made up, liked it, and we decided to try it together. The woman in the shop gave us great advice – trust the directions and follow them step by step without double guessing or looking ahead.

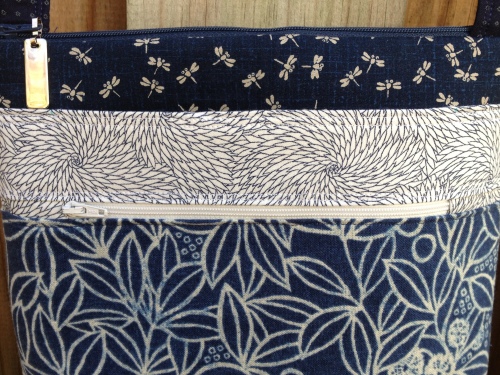
The outside front has a zippered pocket and a non-zippered pocket.

The outside front has a zippered pocket and a non-zippered pocket.

Following this advice did work and the bag does go together very nicely! The only thing that we didn’t think was crystal clear, was where each piece of fabric we cut would end up in the final bag. So let me spell this out for you if you are considering sewing this bag. The “Bag Front and Back” end up being that dark blue fabric on the top of my bag. It does not show on the outside very much but does form the body of the bag.

Two pockets!

Two pockets!

The “Front Pocket” and “Back Pocket” are the blue floral fabric that is the dominant fabric of my bag. Finally, the “Pocket Accent” is the lighter fabric in the middle of the other two fabrics only on the front.

The outside back has a divided pocket.

The outside back has a divided pocket.

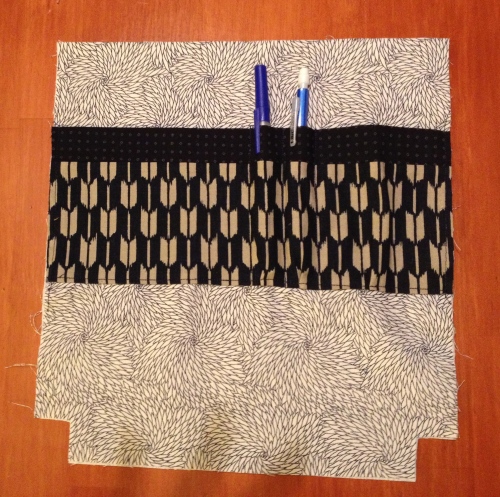
The inside of the bag has a divided pocket on one side. The directions were to divide it in two but I decided to add a couple places for pens also.  I should have dropped the pocket a bit lower in the bag than the directions called for since the pens are so close to the top of the bag, they almost don’t fit under the zippered top.

Inside pocket.

Inside pocket.

The directions tell you how to shorten and make tabs for each end of the two zippers which gives an extremely professional looking finish. It also removes any metal parts that your needle might hit during the sewing and removes the bulk of the zipper from any seams. These are all “win” situations for dealing with zippers! I will use them again in other projects.

Wonderful zipper insertion directions!

Wonderful zipper insertion directions!

As far as I'm concerned, a zipper at the top of a bag doesn't get any better than this!

As far as I’m concerned, a zipper at the top of a bag doesn’t get any better than this!

I used by Annie Soft and Stable instead of fusible fleece for the front and back of the bag and a heavy weight interfacing I had on hand in the places that called for Decorbond. Typically I like a stiffer bag that doesn’t show every lump and bump of what is inside of it. If you like a softer bag, you should use the fusible fleece.

xx

I love this bag!

.

22 Comments

Filed under Pattern review, Purses and Bags