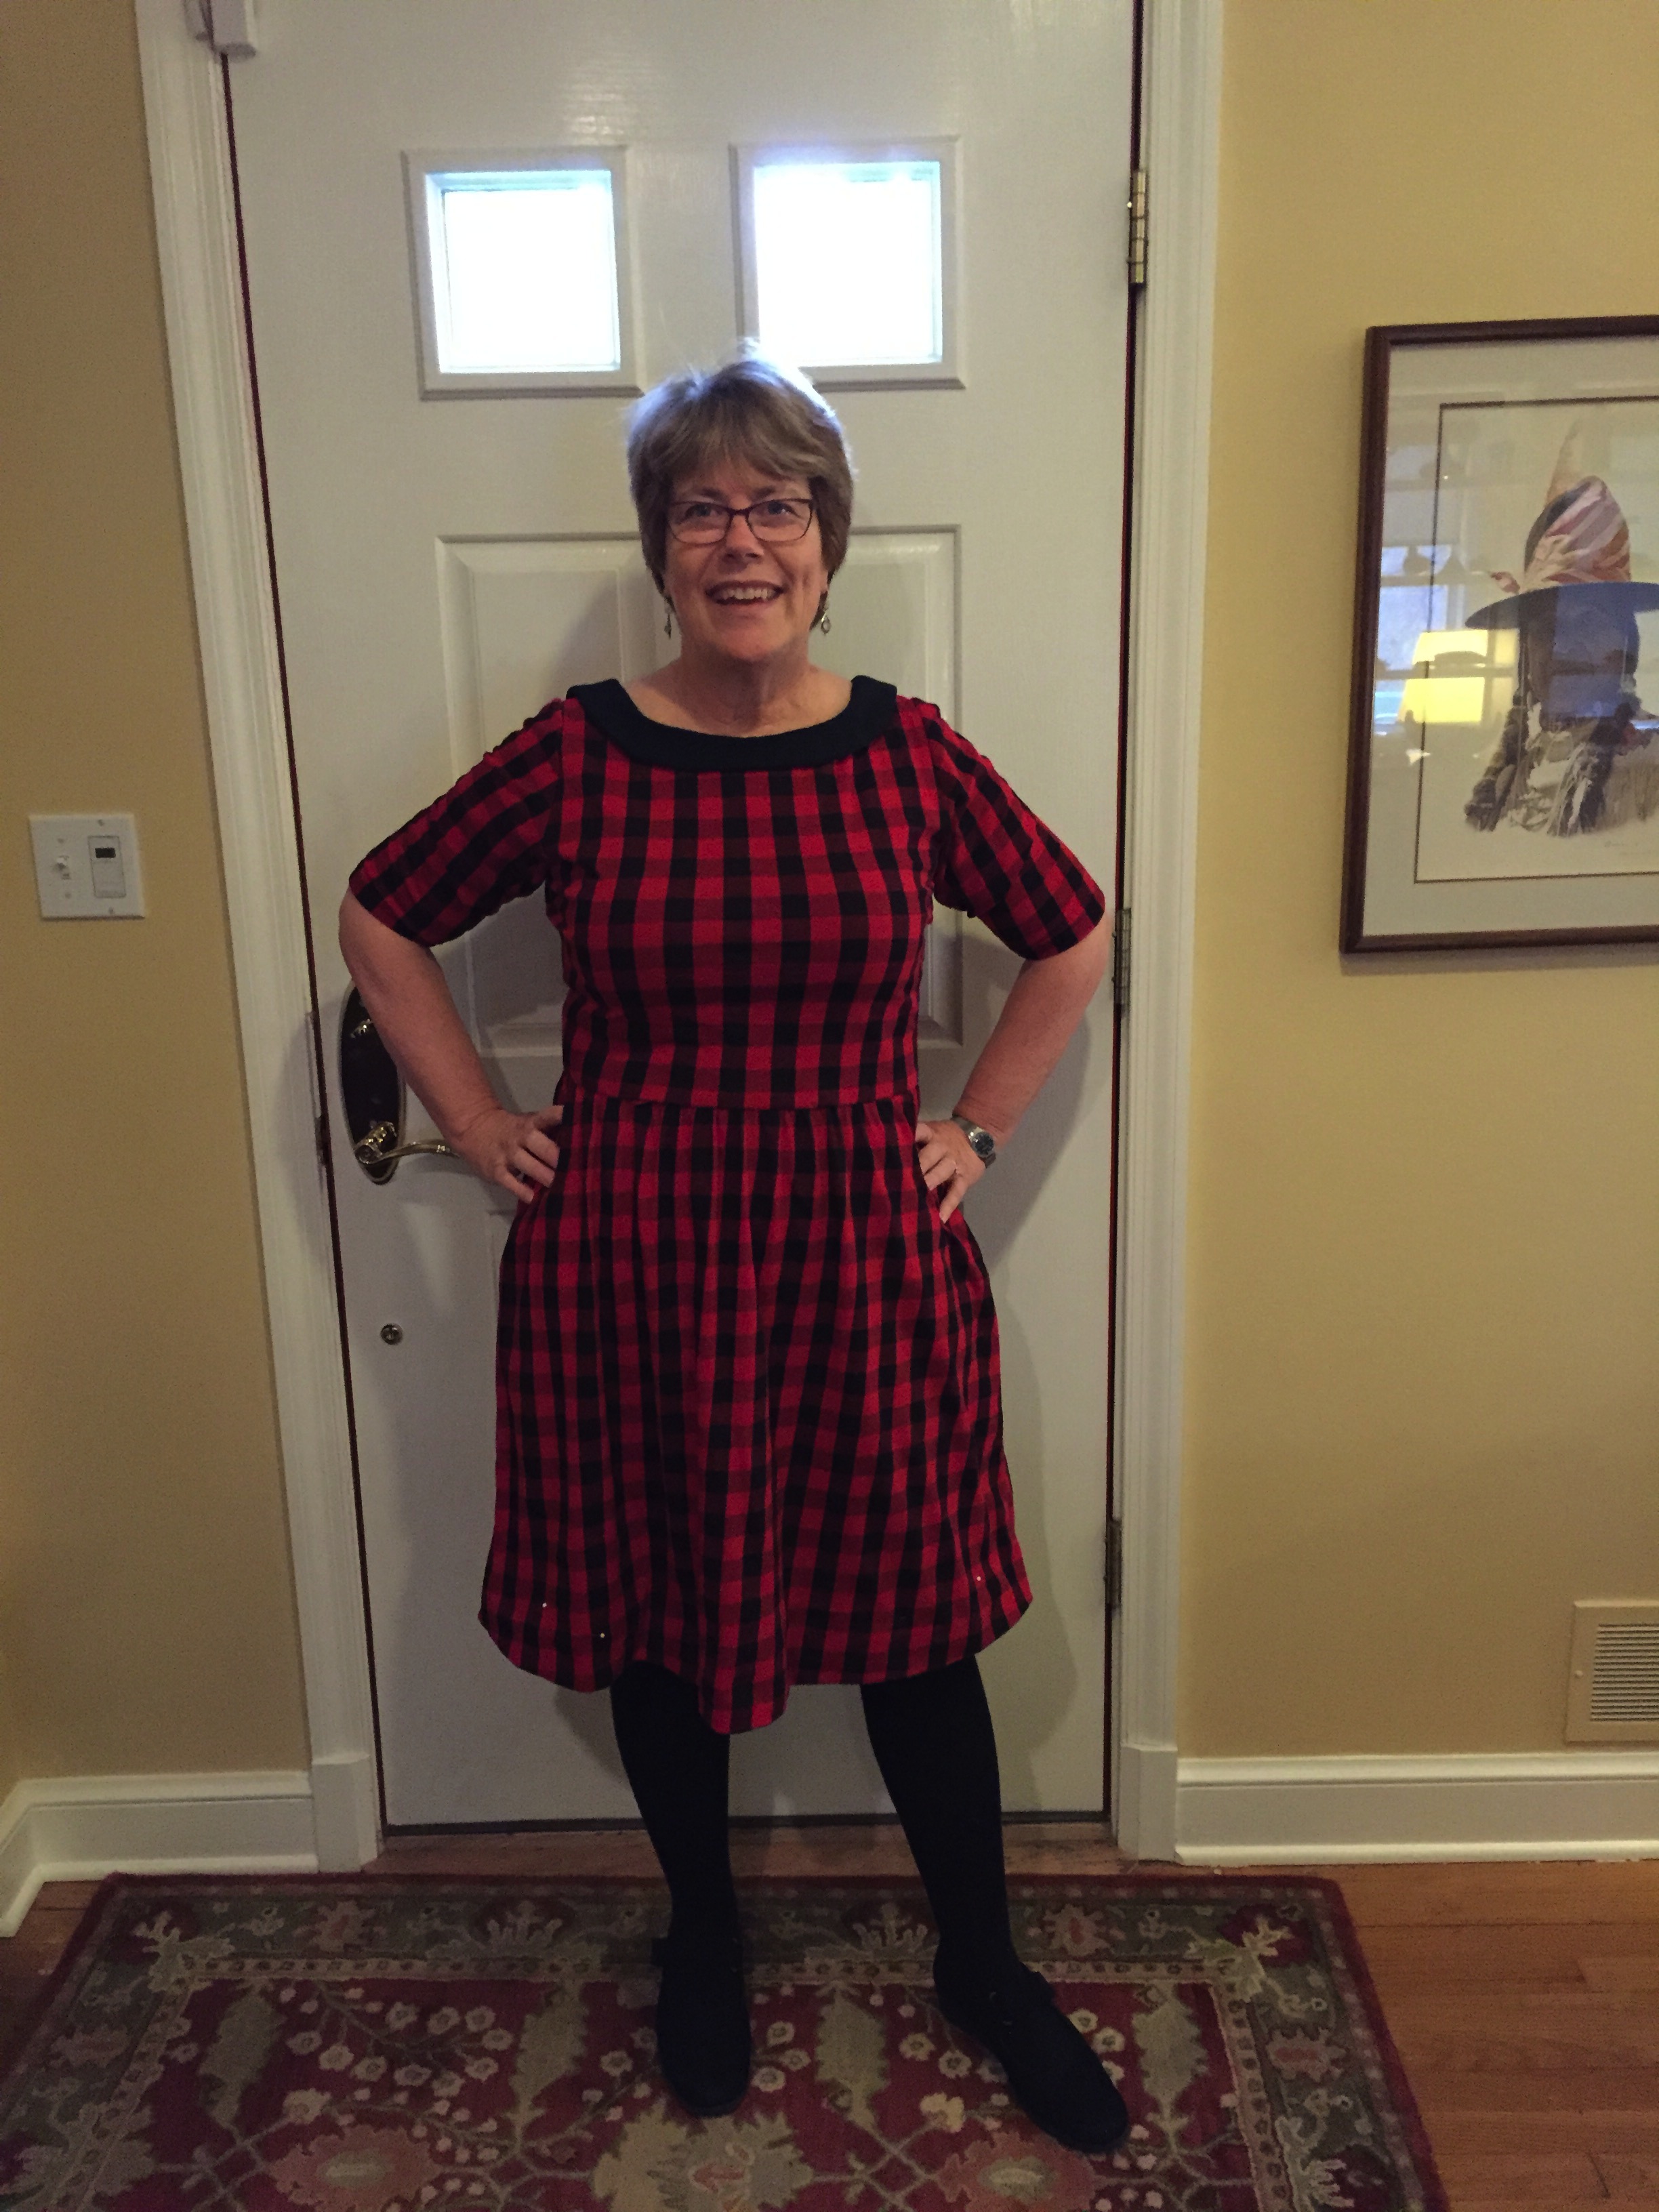
Tag Archives: Colette

The Moneta dress by Colette and sewing with plaid

xx

Moneta Dress

I bought this red plaid knit fabric from the online shop Girl Charlee. I know that it looks like flannel and it kind of feels like flannel. However, it is a nice soft knit. I bought it in December along with their “KnitFix” which is a group of six 2 yard cuts of different knit fabrics. When you order a KnitFix, you don’t know exactly what the fabrics you get are going to look like but they promise they will all be high quality and “on trend”.

The collar has a little center piece that hangs down in the back.

The collar has a little center piece that hangs down in the back.

I seem to be enamored with “mysteries” lately as I also signed up for the Amitie Mystery Block of the Month in December. I haven’t cut into the other knits yet but will soon. There is a Facebook group for those who are sewing with these knits and there has been a lot of sharing of favorite patterns and tips for sewing with knits.

Unable to "cut on the fold".

Unable to “cut on the fold”.

Cutting out this plaid dress was quite a bit of trouble. There is no way you can fold this knit fabric in half and have it line up exactly right. In order to be absolutely sure that the 2 halves were identical, I had to cut it out without folding. I cut one side and then turned the pattern over to lay it on the other side.

Bodice

Bodice

For the bodice I actually marked some of the darker black parts of the plaid on the pattern in order to get it just right. This was very fussy but definitely worth it.

Pockets!

Pockets!

The Moneta pattern has pockets and the collar and sleeves are optional. The pattern says that it’s skill level is “beginner”. I would hate to see a true beginner try to make this dress. There are a number of tricky parts – but I will say that it has very good directions – including a link to a video that shows a lining technique for the sleeveless version. There are also good directions for inserting clear elastic into the waistline which is done to keep that area from stretching out over time.

Knit Moneta dress by Colette

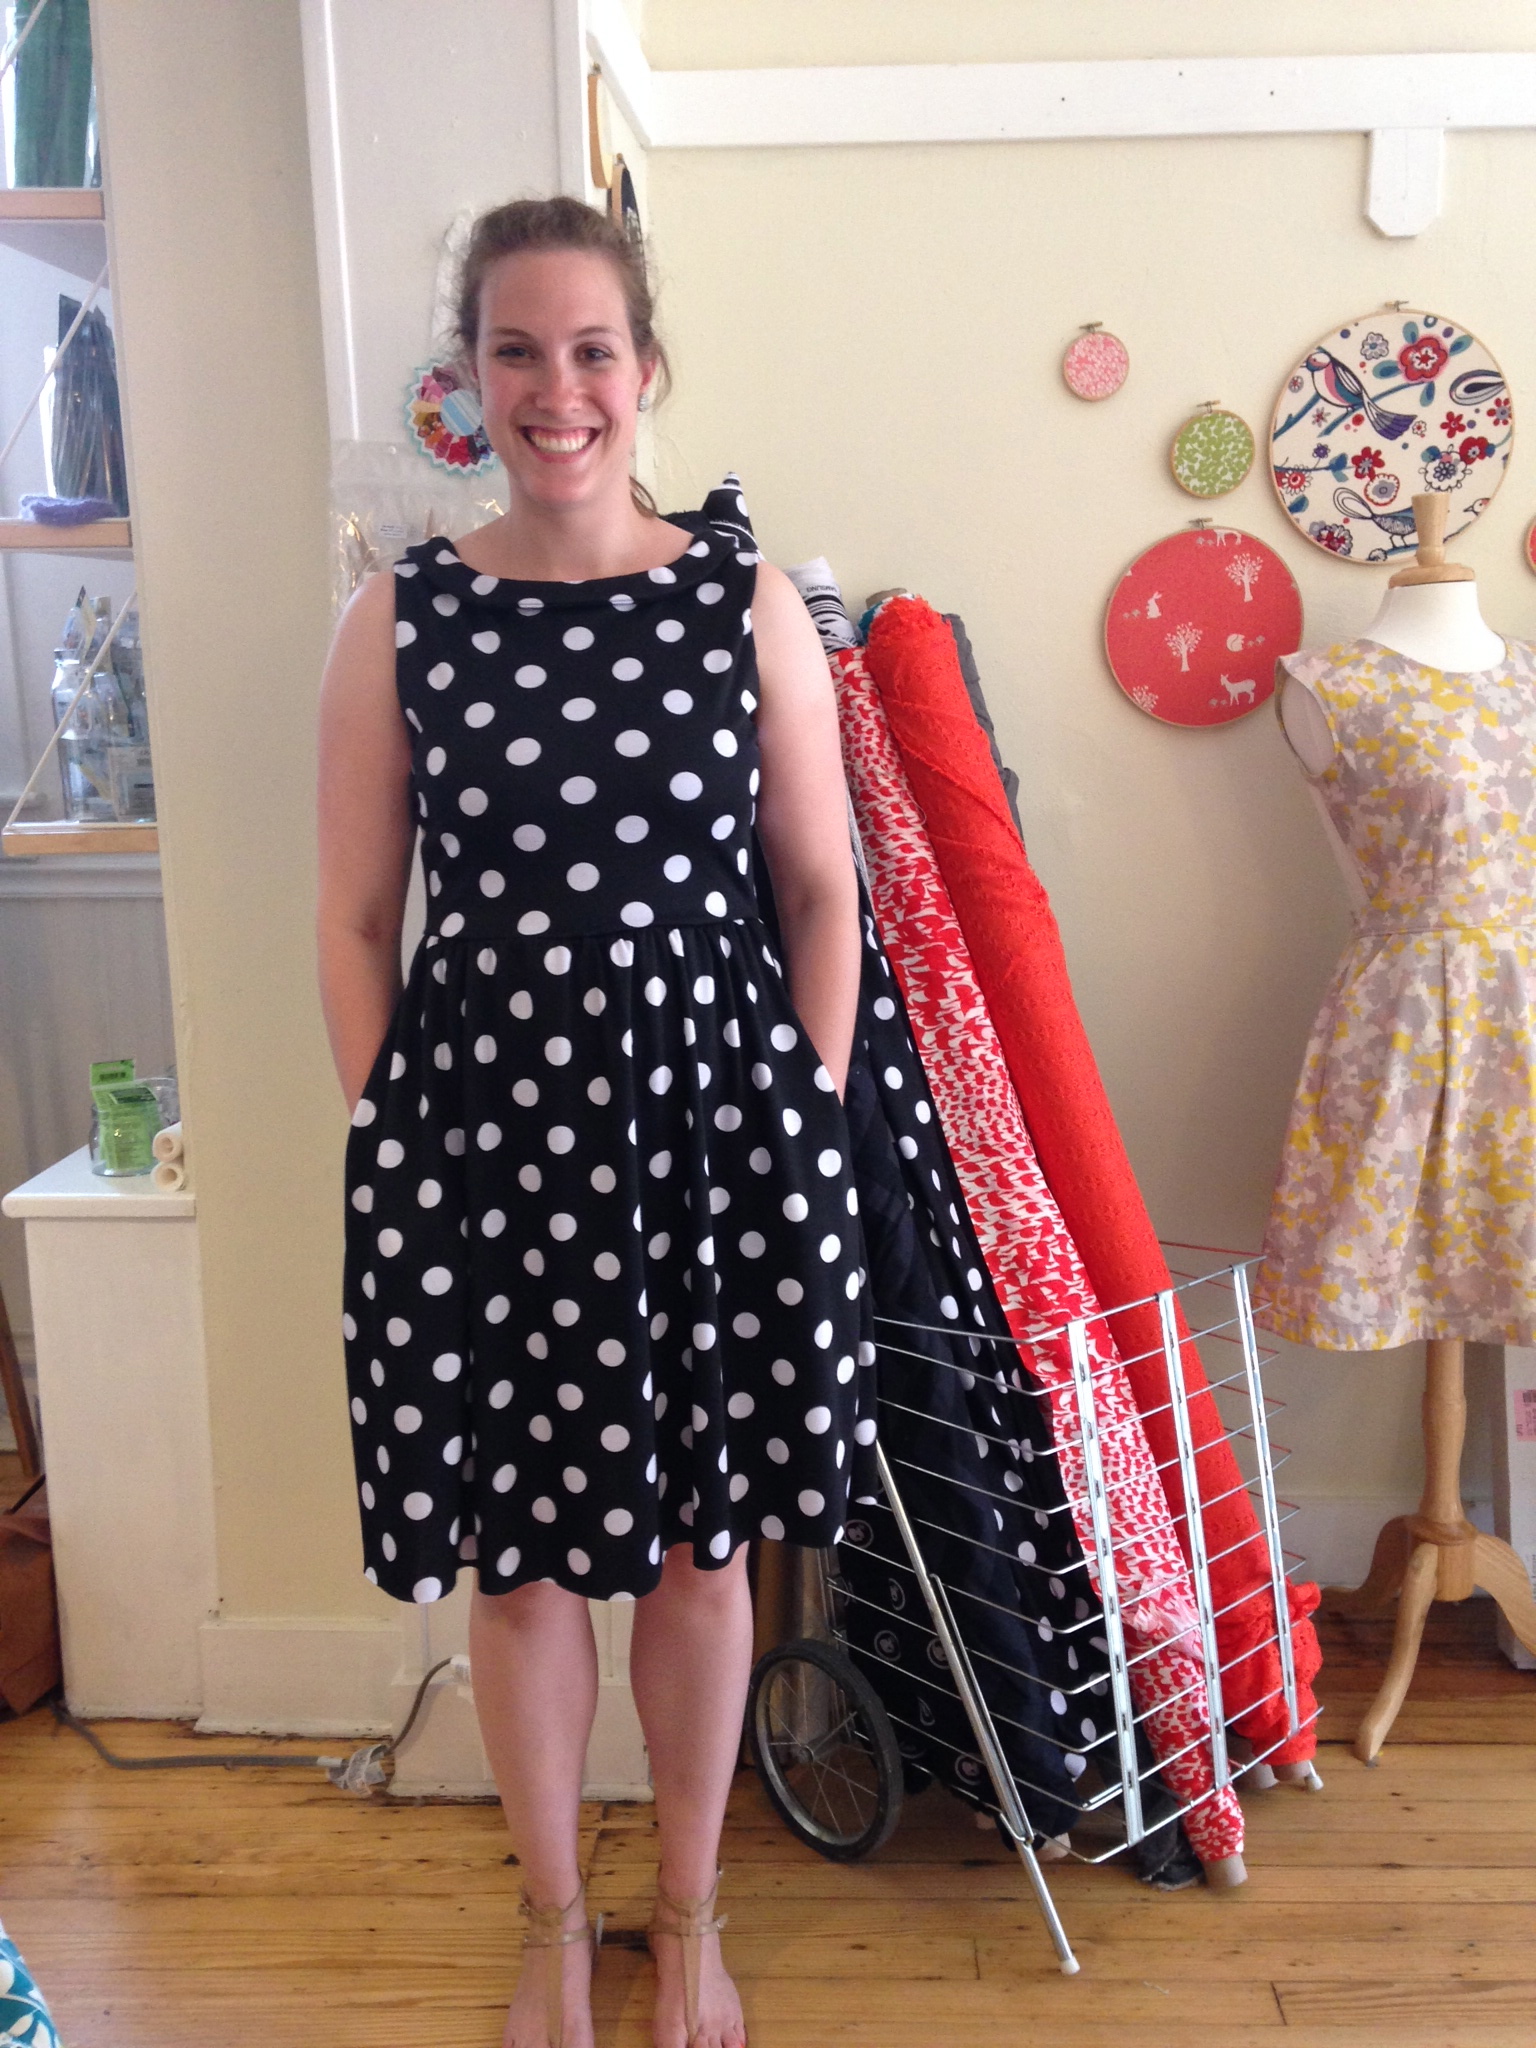
Megan’s sleeveless version

My daughter made the sleeveless version last May. Isn’t she adorable?

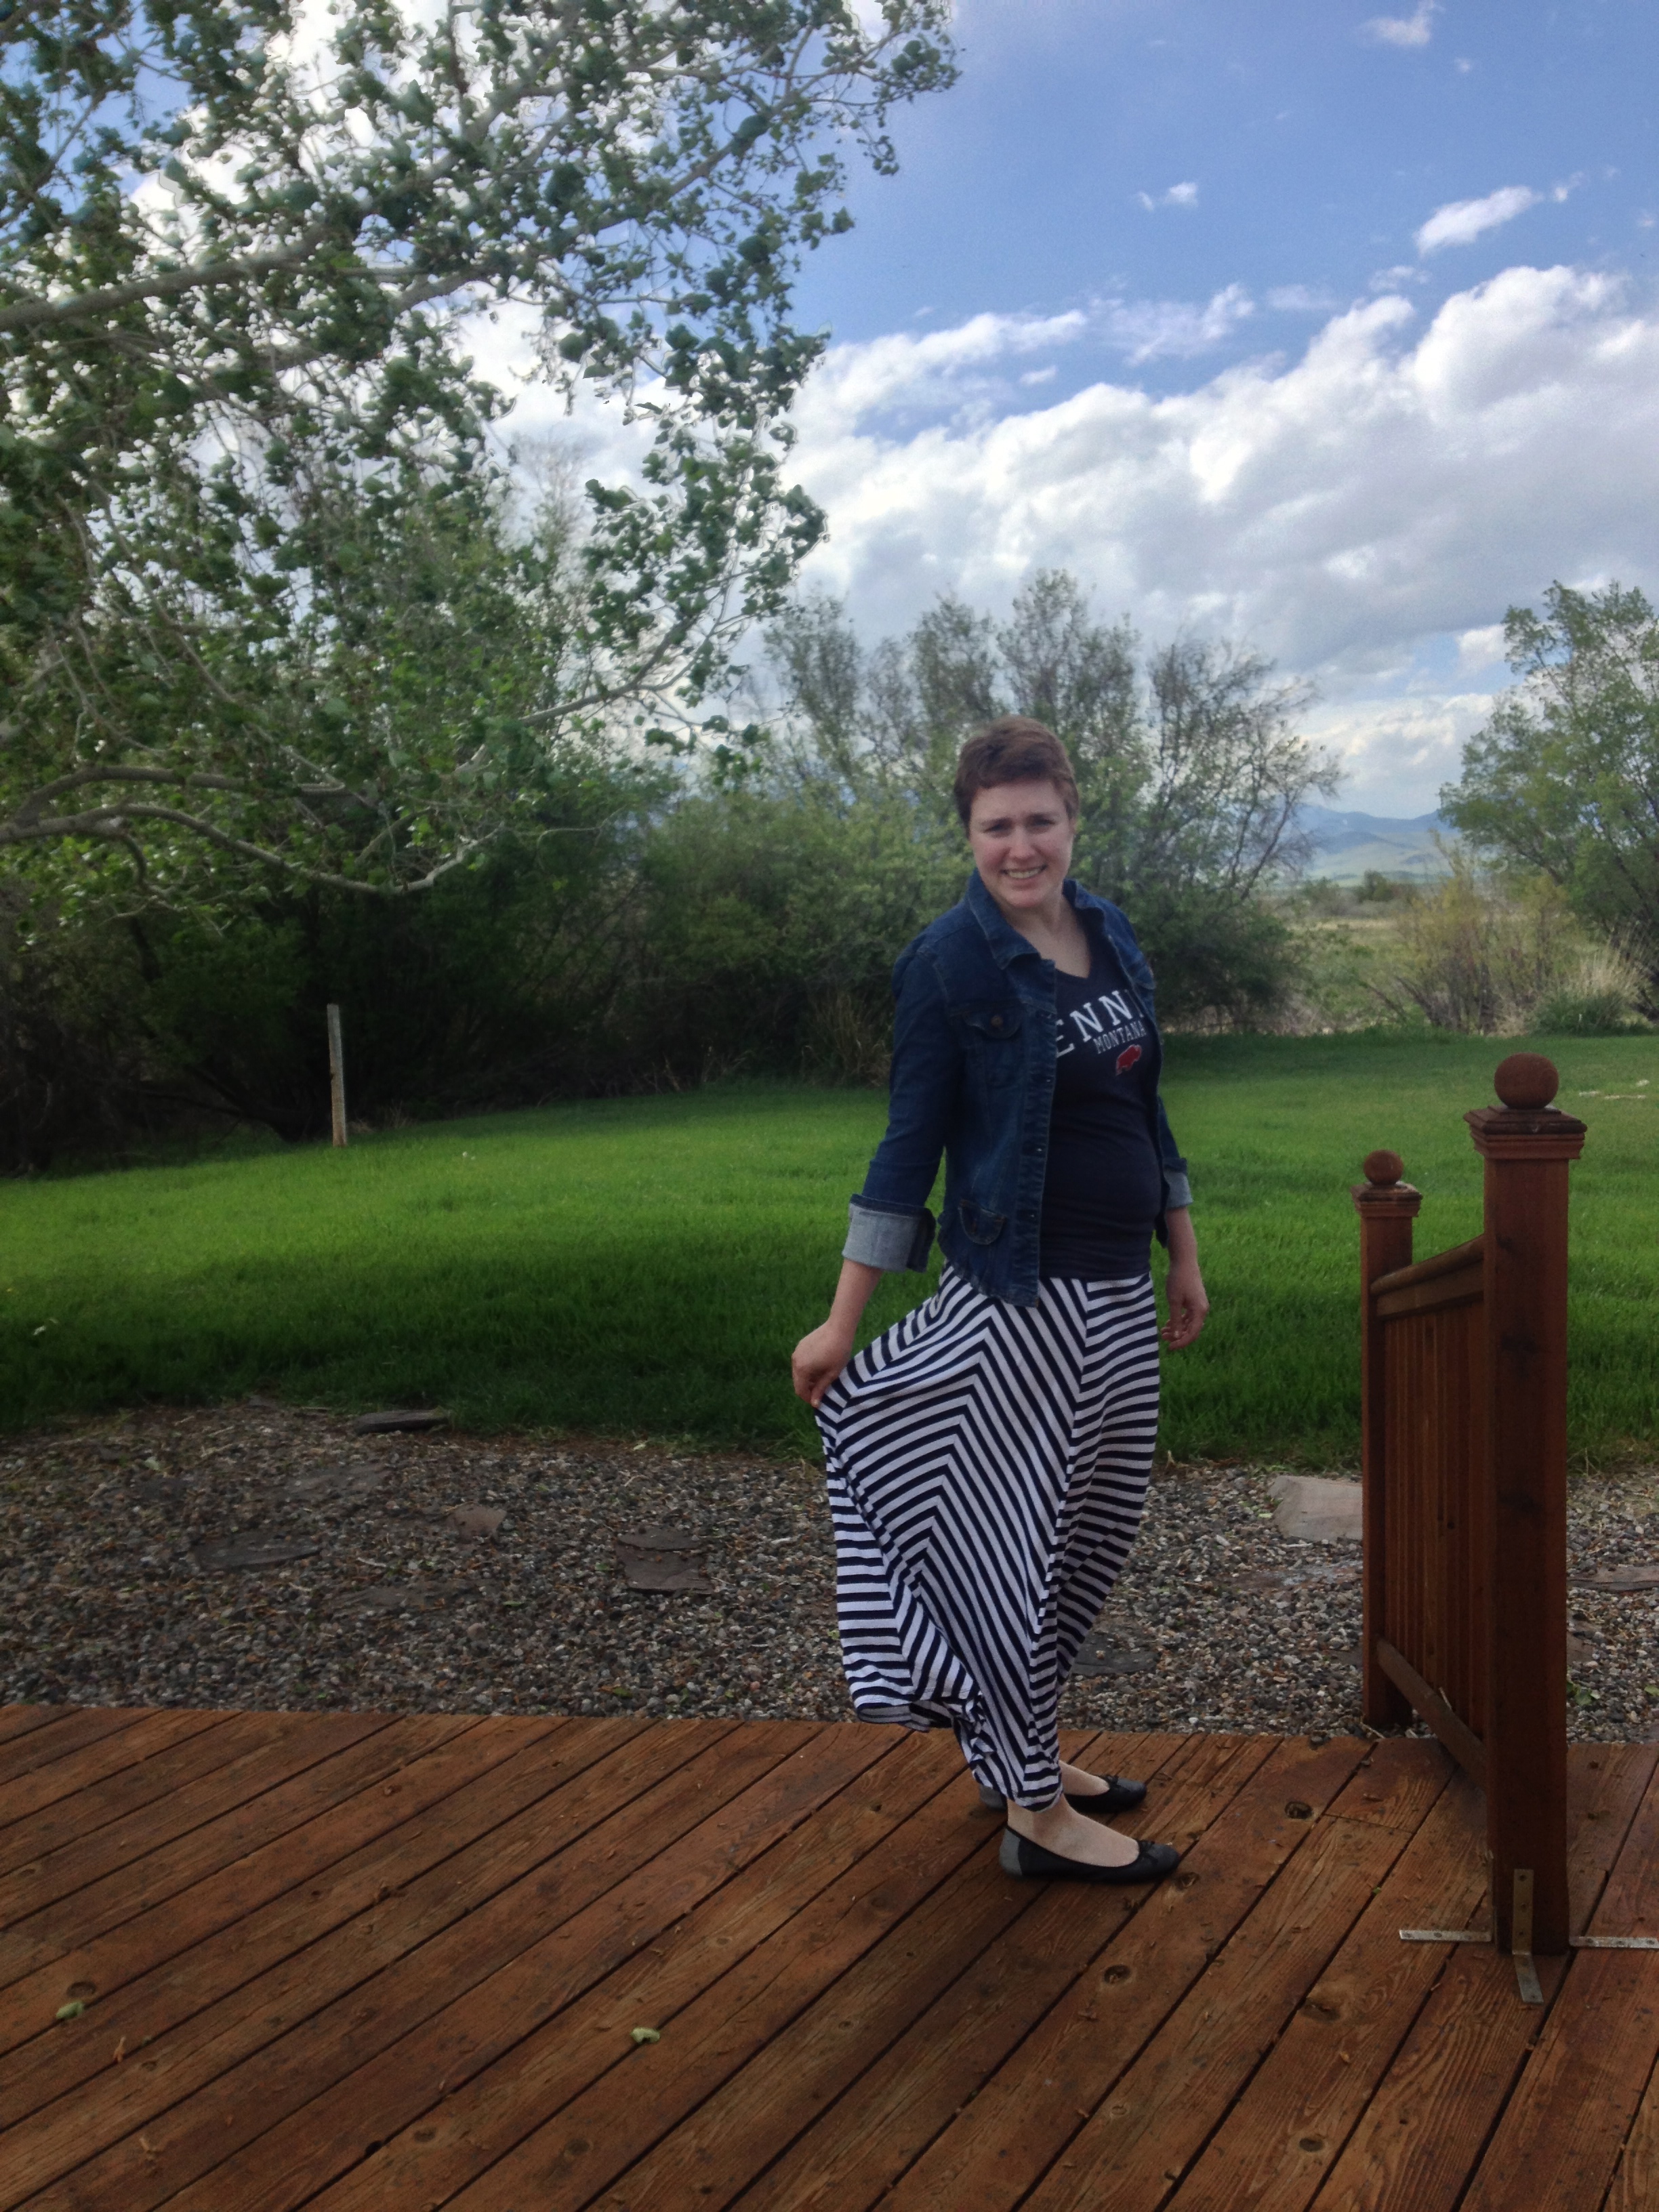
The Moneta pattern has quite a bit of “negative ease”. This means that the garment measurements of the bust and waist are less than your own measurements. The bodice is meant to s-t-r-e-t-c-h and be very form fitting. I think this is more appealing to a younger sewist like my daughter than it is for me. I made a size larger than my measurements called for and it is still very close fitting. Because of the knit fabric, though, it is very comfortable. I am looking forward to sewing with my KnitFix fabrics next!

Notes to myself about making up this pattern –  Size XL. Added 1 inch to center of sleeve. Added 1 inch to length of bodice and graded bodice out to make waist about 1/2 inch larger on each side. Lined the bodice with the same fabric I made the collar out of. Lengthened the hemline by 1.5 inches which is about the size of the hem I turned under. Used ballpoint needles in both my sewing machine and serger. Used a double needle with regular thread in the needles and wooly nylon in the bobbin to hem the skirt and the sleeves. Also used my black latch bobbin case in order to loosen the tension on the bobbin when using the double needle. Used 3/8″ plastic elastic from JoAnns for the waistline but would have preferred 1/4″ if I could have gotten it. Sewed the waistline with a zig zag stitch on my sewing machine rather than using the serger. I would love to make this dress again but would rather not have to match a plaid or stripe!


5 Comments

Filed under Garment sewing, Pattern review

Sewing with Daughters

I am a lucky woman – I have three daughters. I sewed a lot of things for them when they were little.  This included not only dresses or other clothing to wear, but also costumes – dress up clothes, Halloween costumes, dance costumes and school or church play costumes.

My three daughters wearing Easter dresses I made them.

My three daughters wearing Easter dresses I made them. Circa 1990.

They saw me sew a lot of things and now as adults they all have sewing machines and can sew themselves – when and if they have the time! Sometimes I feel silly that I named my blog “I Finally Have Time”, because I actually never feel as though I have that much time to spend on sewing. However, compared to my young professional daughters – I do have much more time. Nothing pleases me more than to actually sew with them.

My youngest daughter, Megan, asked for a sewing day with me for her birthday in May. She wanted to make the Moneta Dress by Colette. We made plans to spend the day at the Finch Sewing Studio in Leesburg, VA where we knew we could purchase the pattern, some great fabric and have lots of space to work without the interruptions that come up at home. We also knew that if we got into trouble with sewing the pattern, Nicole would be there to bail us out. We have already taken a variety of classes from Nicole, but this time we decided to just use her wonderful sewing studio space. Although she does have classes coming up for this dress pattern!

Knit Moneta dress by Colette

Knit Moneta dress by Colette

I didn’t take any process photos and Nicole took this one right before we left for the day. Don’t you LOVE this polka dot dress! And those pockets! Megan did a great job putting it together and there were some tricky parts. Actually, it is not a tricky pattern, but if you chose the sleeveless version, the bodice is lined and there is a magical way of sewing it in which requires extra attention to the directions. Colette also provides a video link to the process for people like me who would like to see it done instead of just reading the instructions. The waist has a narrow clear elastic sewn onto the seam allowance which will keep the knit from stretching out of shape there.

A week later I met my oldest daughter, Lindsey, in Montana and she had a knit maxi skirt that she had bought last summer and some fabric that she wanted to use to try to replicate it. Here is the original skirt on her.

Stripes horizontal on the front and back with Chevron on the sides.

Stripes horizontal on the front and back with Chevron on the sides.

We did not have enough fabric to do those chevrons and so decided to run the stripes vertically on the sides. This had an added benefit of not having to match the stripes. Here is the result:

New skirt

New skirt

The waistband of the purchased skirt looks like this on the inside:

xx

Inner waistband and elastic

There is a strip of clear elastic sewn into the seam allowance of the waist – just like with the dress above! Do you see the line of stitching about an inch below the top of the waistband? That is where a second strip of elastic is sewn inside the waistband. As nice as it is to have a knit waistband, my experience is that cotton knit fabric does stretch and it is nice to have the security of that extra elastic. We did not have access to clear elastic but where able to find 1/2″ white elastic to sew into the new skirt. It worked perfectly. The side seams of the waistband also had some elastic in them to cinch the sides which looked nice.

Cinched side seams.

Cinched side seams.

If only we had one more clothespin!

If only we had one more clothespin!

Lindsey happily left for home a few days later wearing this skirt.

I don’t know when I’ll have a chance to sew with my middle daughter, Sandy, but I hope it is soon. Most of the sewing she has done recently is to make pillows which she sells. She has a process to create a stencil using her computer and a Silhouette cutting machine. She can take words that are meaningful to someone and “paint” (actually ink) them onto fabric and then create a pillow. Below is one of three pillows she made for my brother and sister and me regarding our childhood summer home commonly referred to as “camp”.

Front

Front

Back (zipper hidden underneath)

Back (zipper hidden underneath)

My family will all be gathered at camp soon and can not wait to get there!


8 Comments

Filed under Family, Garment sewing, Pillows

The Sorbetto top from Colette

Sorbetto top with added sleeves.

Sorbetto top with added sleeves.

I’m taking the Whipstitch Fall Garment Class online. Last week we learned a lot about preparing fabrics and patterns. This week we worked on the first project which is the Sorbetto top from Colette.

This pattern available as a free download

This pattern is available as a free download

You can download the pattern here which prints out on regular sized paper (16 pages!) and you cut and tape the pages together. It comes in sizes 0 – 18. It was suggested that we make a “wearable muslin”. This means sewing up the pattern in a fabric that you won’t be too disappointed if it doesn’t fit perfectly. This way you would make adjustments to the pattern to make it up in fabric you really love (but you would also be able to wear the not as perfect version in the other fabric).

Muslin top to check for fit

Muslin top to check for fit

I had plenty of muslin and not enough yardage of “other” fabric and so I just went ahead and made it in muslin – in 2 different sizes because I was between sizes. – isn’t that always the way? I also experimented with adding a sleeve. There were several sleeve versions that other sewing bloggers have kindly drafted that I was able to find online and print out.

Drafted sleeves for the Sorbetto top

Drafted sleeves for the Sorbetto top

Mena Trott from the Sew Weekly gives a roughly drafted sleeve pattern here (pictured in the middle above). Mena blogged about a week of Sorbetto tops that she sewed. She made a different version each day for a week. You can find  links to them at the bottom of this post of hers.

The Sleeve Pattern on the bottom is a version that Claire from Sew, Incidentally made up as a pdf from Mena’s version. Both were way too small for my size blouse so I lengthened both at the ends and in the middle to get a pattern that would fit.

I did not make any changes to the armhole of the blouse and sewed the sleeve in with a 1/4″ seam allowance as this is what was called for if you bound it with bias tape.

xx

I added 2 inches to the length of the top

The Sorbetto top is a very basic pattern. There is a front and a back, both cut out on the fold. The pleat detail in the middle of the front is very simple to make. There are bust darts on the front and the directions give you very good advice about sewing those. The neck and armholes (if you don’t add sleeves) are finished with bias tape – either cut from the same or contrasting fabric or purchased. The bias tape is sewn to the inside and then flipped to the outside such that it shows. It adds a nice finishing detail.  The hem is simply folded over twice and stitched.  There are no buttons or zipper – must be pulled on and off.

xx

Sheer fabric

I made my version from 100% cotton black dotted swiss fabric which I purchased at G. St. Fabrics. This is one of those fabrics that is very sheer looking by itself but not when you’re wearing it.

xx

Alterations I made to this pattern:

Added sleeves, added 2 inches in length and made a very slight adjustment to the neckline because it felt too wide.

What I like about this pattern:

Very simple to make and also simple to change up. Bias neckline could be contrasting fabric. Buttons or interesting trim could be sewn to the front pleat. Shirt is very comfortable to wear.

What I don’t like:

Boxy shape. Neckline still feels a bit wide.

Would I make it again?

Probably yes, but I don’t feel as though I want to make another right away (which means I’m not 100% in love with it)!

15 Comments

Filed under Garment sewing